
Set a Custom EQ for Your AirPods in iOS 27
Unlock Your Perfect Sound: A Comprehensive Guide to Custom AirPods EQ in iOS 27
For years, owners of high-end headphones from industry giants like Sony, Bose, and Sennheiser have enjoyed the power to fine-tune their audio experience, meticulously adjusting the sound to match their preferences or the nuances of specific music genres. This level of granular control, however, was largely absent for Apple's loyal AirPods users, who, for the most part, had to accept Apple's expertly crafted, yet fixed, default audio tuning.
That era of limited sound customization is now a thing of the past. With the highly anticipated arrival of iOS 27, Apple has introduced a groundbreaking feature that empowers AirPods owners with an unprecedented level of audio control: a dedicated three-band equalizer, seamlessly integrated into the AirPods settings screen. This is more than just a minor update; it's a significant leap forward, offering a truly personalized listening experience that was once a distant dream for AirPods enthusiasts.
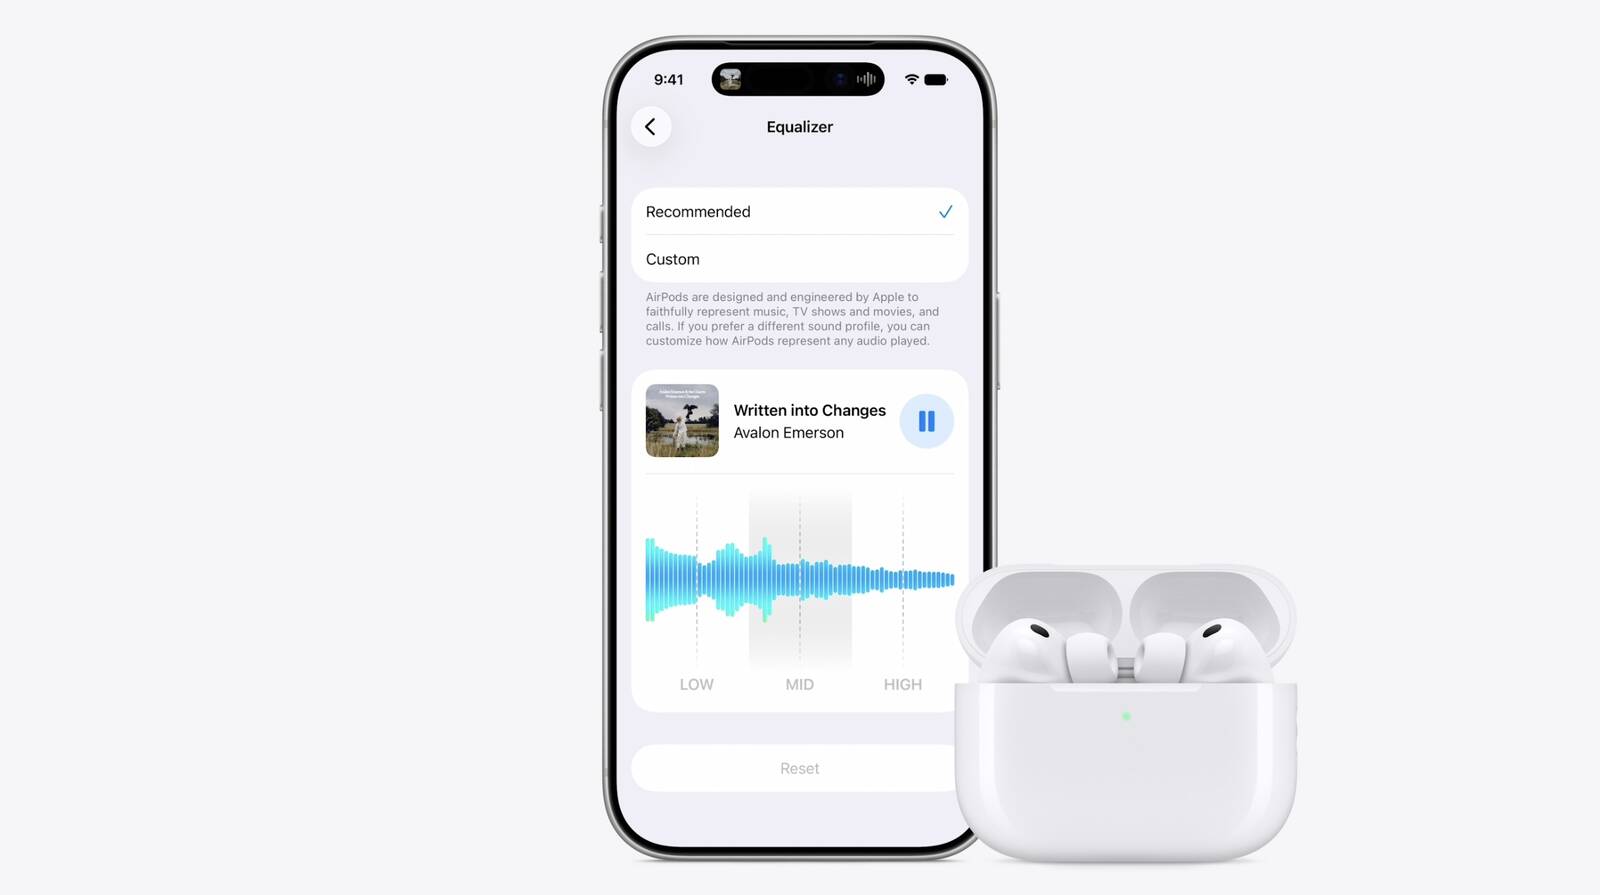
It's important to differentiate this new feature from an older, more limited equalizer setting that has existed within iOS for quite some time. Previously, you could find an EQ option tucked away in Settings ➝ Apps ➝ Music. While this older EQ did allow for some sound adjustments, its functionality was severely restricted: it applied solely to playback within the Apple Music app, and its effects were universal, working on any pair of headphones connected to your device, not specifically tuned for AirPods.
The new equalizer introduced in iOS 27 is a completely different beast. This powerful new tool is specifically and intelligently tied to your connected AirPods. This means that any custom EQ profile you create will apply to absolutely everything you listen to through your AirPods – whether it's Apple Music, Spotify, podcasts, YouTube videos, phone calls, or even movie soundtracks. Furthermore, one of the most exciting aspects of this update is its seamless integration across Apple's ecosystem. Once you've crafted your perfect sound profile on your iPhone, that custom EQ automatically carries over and applies when you pair your AirPods with your iPad running iPadOS 27 or your Mac running macOS 27 Golden Gate. This ensures a consistent and personalized audio experience no matter which Apple device you're using.
Understanding the Power of Personal Sound: Why an Equalizer Matters
Before diving into the "how-to," let's take a moment to understand what an audio equalizer truly is and why having control over it can dramatically enhance your listening experience. At its core, an equalizer (EQ) is an audio filter that allows you to boost or cut the level of specific frequency bands within an audio signal. Think of sound as a spectrum, ranging from very low rumbling bass to crisp, high-pitched treble. Different instruments, vocals, and sound effects occupy different parts of this spectrum.
The Human Element: Taste and Hearing
No two people hear exactly alike, and certainly, no two people have the exact same audio preferences. Some listeners crave deep, resonant bass that makes their music feel impactful and energetic. Others prioritize crystal-clear vocals and intricate instrumental detail, preferring a more balanced or even treble-focused sound. Furthermore, individual hearing can degrade differently over time, or some listeners might have specific sensitivities to certain frequencies. A custom EQ allows you to tailor the sound to your unique ears and preferences, effectively creating a "sound signature" that is perfect for you.
Adapting to Content and Environment
Beyond personal taste, the type of audio content you're consuming also dictates an ideal sound profile. What sounds great for a bass-heavy electronic dance track might not be suitable for a delicate classical piece, a spoken-word podcast, or a dialogue-driven movie. With a custom EQ, you can:
- Boost Bass: Give more punch to hip-hop, EDM, or action movie explosions.
- Enhance Vocals: Bring clarity to podcasts, audiobooks, or vocal-centric music genres.
- Soften Treble: Tame harsh sibilance in recordings or reduce fatigue from overly bright mixes.
- Brighten Sound: Add sparkle and detail to acoustic music or make dialogue clearer in some scenarios.
Even your listening environment can influence how sound is perceived. A noisy environment might benefit from a slight bass boost to compensate for low-frequency masking, while a quiet setting might reveal subtle harshness in the highs that you'd want to mellow out. The ability to adjust your AirPods' EQ transforms them from a one-size-fits-all device into a versatile tool that adapts to your world.
What You Need to Get Started
Before you can dive into customizing your AirPods' sound, there are a few essential requirements you'll need to meet. This new feature relies on specific hardware and software integrations, so compatibility is key.
The H2 Chip: The Brain Behind the Sound
The custom EQ feature requires Apple's advanced H2 chip. This powerful, custom-designed silicon is at the heart of Apple's latest AirPods models, enabling a host of intelligent audio processing capabilities, including advanced Active Noise Cancellation, Adaptive Transparency, Spatial Audio, and now, real-time custom equalization. The H2 chip provides the necessary processing power to apply these complex audio adjustments without introducing latency or significantly impacting battery life.
Therefore, custom EQ support is limited to the following AirPods models:
- AirPods Pro 2nd Generation
- AirPods Pro 3rd Generation (Future release, assuming the H2 chip continues)
- AirPods 4th Generation (Future release, assuming the H2 chip continues)
- AirPods Max 2nd Generation (Future release, assuming the H2 chip continues)
Unfortunately, earlier models, including the original AirPods Max, AirPods Pro 1st generation, and all previous standard AirPods models (1st, 2nd, and 3rd generations), are not compatible with this specific feature. This is a hardware limitation, meaning a software update alone cannot enable it on devices lacking the H2 chip. If you own an older model, you'll still be able to use the Apple Music-specific EQ, but not the new system-wide AirPods EQ.
Software Updates: iOS 27, iPadOS 27, and macOS 27 Golden Gate
Beyond the hardware, you'll also need the latest software. The custom EQ functionality is deeply integrated into the operating system, requiring:
- iOS 27 for your iPhone
- iPadOS 27 for your iPad
- macOS 27 Golden Gate for your Mac
These operating system versions introduce the necessary APIs and user interface elements to access and manage the new equalizer settings.
AirPods Beta Firmware: The Bridge to New Features
In addition to the main OS updates, your AirPods themselves will need current beta firmware. Apple often rolls out new features to its accessories via firmware updates, and the custom EQ is no exception. If you've updated your iPhone to iOS 27 but don't see the Equalizer option, updating your AirPods firmware is likely the missing step. Don't worry, the process is straightforward, though it requires a little patience.
How to Install AirPods Beta Firmware: A Detailed Guide
Installing beta firmware for your AirPods is a process that needs to be done carefully to ensure it completes successfully. Follow these steps:
- Ensure AirPods are Paired and Connected: First, make sure your compatible AirPods (e.g., AirPods Pro 2) are paired with your iPhone and actively connected. You can confirm this by putting them in your ears or checking the Bluetooth settings.
- Navigate to AirPods Settings: On your iPhone, open the Settings app. You should see your AirPods listed near the top of the screen, usually just below your Apple ID banner, as "Your Name's AirPods" or similar. Tap on this entry to access your AirPods-specific settings.
- Locate "AirPods Beta Updates": Within your AirPods settings, scroll down until you find an option labeled AirPods Beta Updates. Tap on this option.
- Toggle On Beta Updates: Inside the "AirPods Beta Updates" screen, you'll likely see a toggle. Switch this toggle to the "On" position. You might be asked to agree to beta terms and conditions. Read them if you wish, then accept to proceed.
- Prepare for Installation: This is the crucial part for the firmware to install. Follow these conditions diligently:
- AirPods in Case: Place both AirPods back into their charging case.
- Case Connected to Power: Connect the AirPods charging case to a power source using a Lightning or USB-C cable, or place it on a wireless charger. The case needs to be charging.
- Case Near Unlocked iPhone: Keep the AirPods case within close proximity (a few inches to a foot) of your unlocked iPhone. Your iPhone needs to be active and unlocked for the background download and installation process to initiate and complete.
- Wait for the Update: The firmware update process happens quietly in the background. There's no progress bar or explicit notification that it's installing or complete. It relies on your iPhone to push the update to your AirPods. Apple typically states that this process "shouldn't take more than half an hour," but it can sometimes take longer depending on network conditions, device activity, and other factors. It's best to leave your iPhone unlocked and near the charging AirPods case for at least an hour, or even overnight, to ensure the update has ample time to install.
- Verify Installation (Optional but Recommended): Once you believe the update has finished, you can check your AirPods' firmware version. Go back to Settings > Your AirPods > About. Look for the "Firmware Version" number. While Apple doesn't typically publish beta firmware version numbers publicly, you should see a newer version than what was installed previously. Alternatively, the "Equalizer" option should now appear in your AirPods settings if the update was successful.
Troubleshooting Tip: If the "Equalizer" option still doesn't appear after waiting, try restarting your iPhone and repeating the steps. Ensure your iPhone itself is running iOS 27. Sometimes, simply using your AirPods for a short period after enabling beta updates can also trigger the firmware installation.
How to Adjust Your AirPods EQ: A Step-by-Step Guide to Customizing Your Sound
Once you've met all the requirements – compatible AirPods, iOS 27, and the latest AirPods beta firmware – you're ready to unlock the full potential of your AirPods' sound. Here’s how to navigate the settings and adjust your custom equalizer:
- Connect Your AirPods: Ensure your compatible AirPods (e.g., AirPods Pro 2) are connected to your iPhone. The easiest way to do this is to put them in your ears.
- Open Settings: On your iPhone, launch the Settings app.
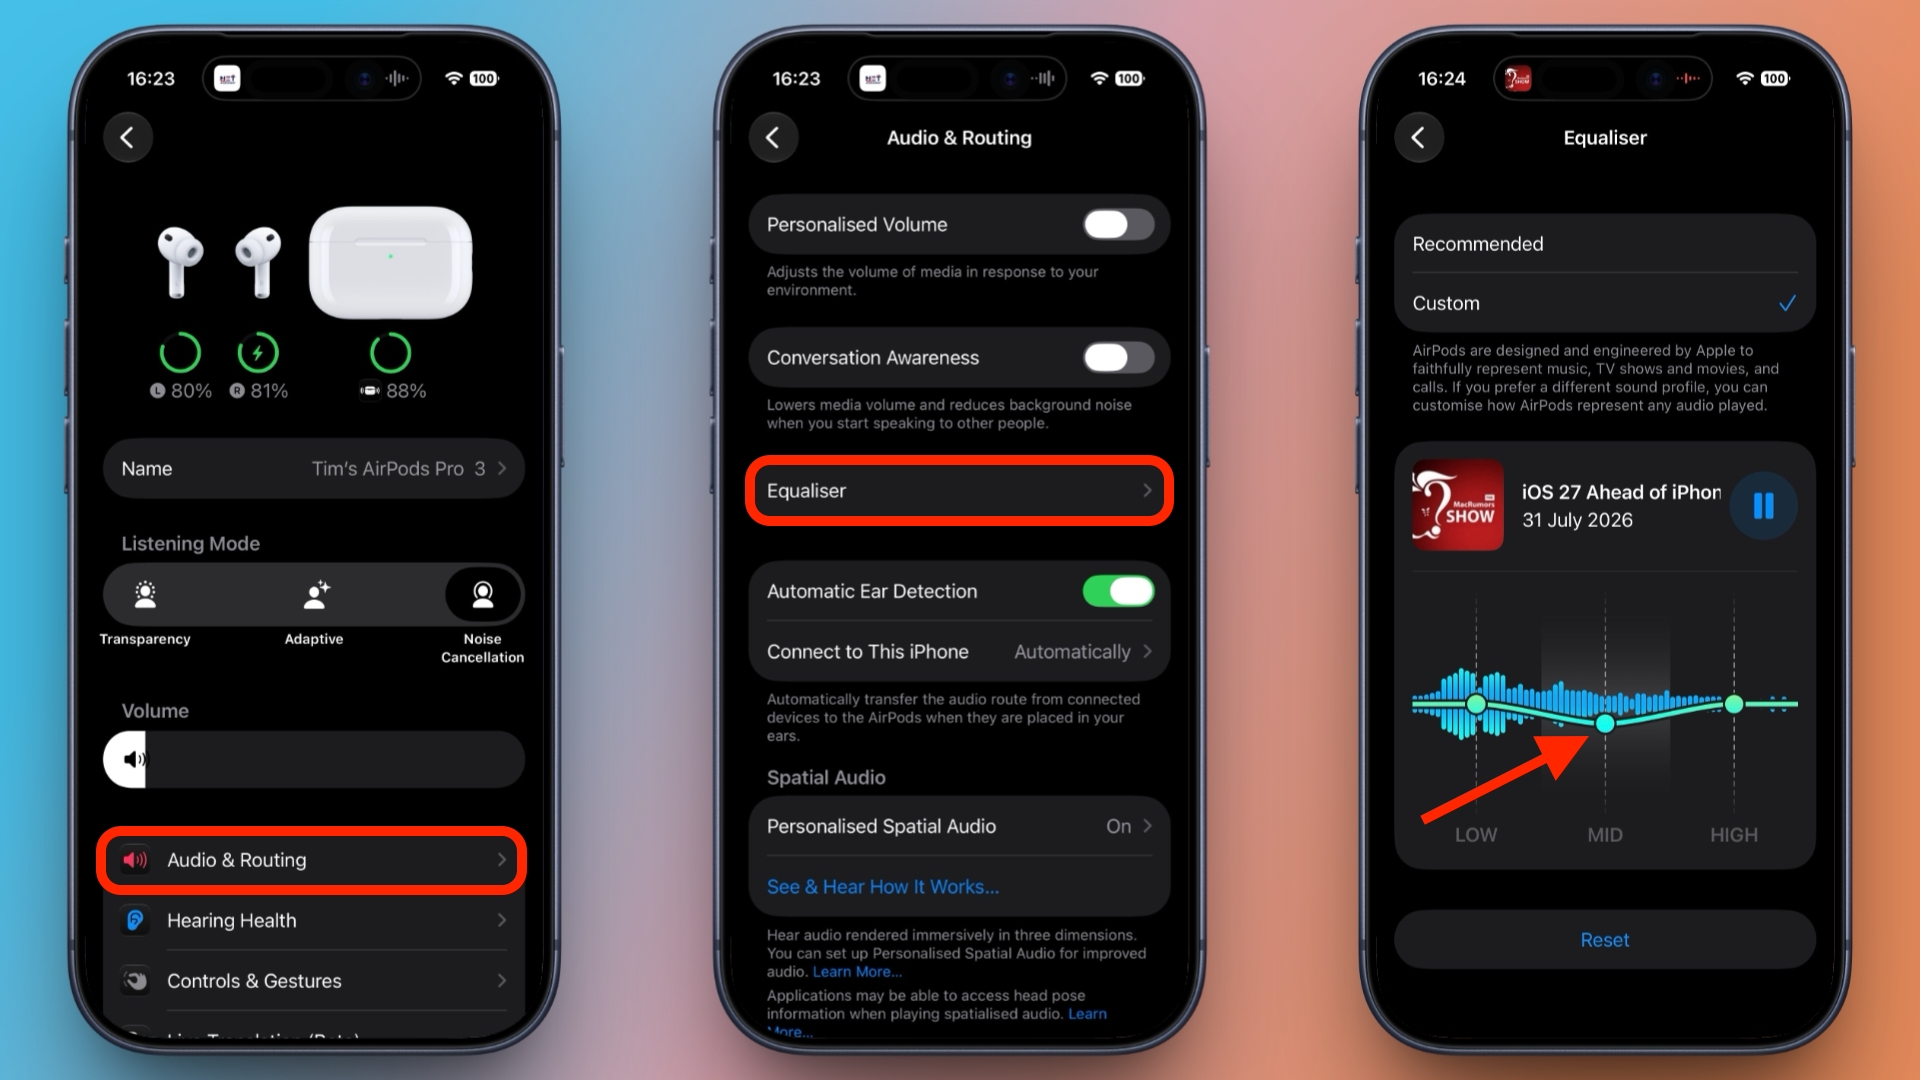
- Tap Your AirPods: At the very top of the Settings screen, you'll see a dedicated section for your AirPods, typically displaying their name (e.g., "John's AirPods Pro"). Tap on this entry. This will take you to all the specific settings for your connected AirPods.
- Tap Audio & Routing: Within your AirPods settings, locate and tap on the Audio & Routing option. This section consolidates various audio-related preferences for your AirPods.
- Tap Equalizer: Inside the "Audio & Routing" menu, you will now see a new option labeled Equalizer. Tap on it.
- Choose Custom and Adjust Sliders:
- On the Equalizer screen, you'll see a few options like "Recommended," "Reset," and "Custom." Tap on Custom to enable the adjustable sliders.
- You will then see three distinct control points: Low, Mid, and High. These represent the three frequency bands you can adjust.
- To modify your sound, simply drag the low, mid, and high points up or down.
Understanding the Three Bands: Lows, Mids, and Highs
To effectively customize your sound, it helps to understand what each of these three bands controls:
Lows (Bass Weight)
- What it Affects: This slider controls the low-frequency range of your audio. Think of the deep thumps of a kick drum, the rumble of a bass guitar, the foundation of electronic music, or the powerful impact of explosions in movies. Boosting the lows will add more "bass weight" and warmth to your sound.
- How to Use It:
- Boosting: Increase this if you want more punch, thump, and warmth, especially for genres like Hip-Hop, EDM, R&B, or action films.
- Cutting: Decrease this if your audio sounds too boomy, muddy, or if the bass is overwhelming the other elements. Too much bass can make the sound less clear and fatigue your ears.
- Common Scenario: If you feel your music lacks "oomph" or a strong rhythmic drive, try boosting the lows slightly. If voices sound muffled or indistinct, a slight cut to the lows might help clear things up.
Mids (Vocals and Instruments)
- What it Affects: The mid-range frequencies are arguably the most critical part of the audio spectrum. This is where human vocals primarily reside, along with a vast array of instruments like guitars, pianos, violins, trumpets, and most percussion. The mids give music its "body" and directness.
- How to Use It:
- Boosting: A slight boost can bring vocals forward, make dialogue clearer, or add presence to lead instruments. This can be beneficial for podcasts, audiobooks, or vocal-centric music.
- Cutting: Excessive mid-range can make audio sound "boxy," "nasal," or even harsh and fatiguing, especially in the upper-mids. A slight cut can help create a more "open" sound, reducing harshness in some mixes.
- Common Scenario: If voices sound distant or buried in the mix, try boosting the mids. If instruments sound overwhelming or harsh, a subtle cut might smooth things out.
Highs (Treble Detail and Sibilance)
- What it Affects: The high-frequency range is responsible for the "sparkle," "air," and detail in your audio. This includes the shimmer of cymbals, the clarity of high-pitched vocals, the crispness of string instruments, and the overall sense of brightness in a recording. It also controls "sibilance" – the harsh 's' and 't' sounds that can sometimes be piercing.
- How to Use It:
- Boosting: Increase this to add clarity, detail, and a sense of "openness" to your sound. This can make music sound brighter and more vibrant.
- Cutting: Decrease this if the sound is too harsh, piercing, or fatiguing, especially if you notice overly aggressive 's' sounds (sibilance) in vocals. Too much treble can quickly lead to listening fatigue.
- Common Scenario: If your audio sounds dull or muffled, a small boost to the highs can inject life and detail. If you find recordings too sharp or your ears get tired quickly, a gentle cut can make the listening experience much more comfortable.
Real-time Feedback: Listen as You Adjust
One of the best features of this new EQ is the immediate feedback it provides. You should see a media playback control conveniently located above the EQ sliders, displaying the last thing you listened to. This allows you to play audio and hear exactly how your adjustments sound in real time. This "auditioning" capability is crucial for making informed decisions about your sound profile. We recommend playing a variety of your favorite tracks or different types of audio content (e.g., a song with strong bass, a podcast, a track with clear vocals) as you make adjustments to get a well-rounded feel for your changes.
Undoing Changes and Restoring Defaults
Don't be afraid to experiment! If you make adjustments and don't like the results, or if you simply want to start over, Apple provides easy ways to revert your changes:
- Reset: To undo your current custom EQ settings and return the sliders to their neutral, flat position, simply tap the Reset option at the top of the Equalizer screen.
- Recommended: If you want to revert to Apple's default, expertly tuned sound profile for your AirPods, choose the Recommended option. This is often a balanced and pleasant starting point, reflecting Apple's careful audio engineering.
Your Custom Sound, Everywhere: Seamless Ecosystem Integration
Beyond the iPhone, your personalized audio profile extends seamlessly across your other Apple devices. You'll find all the same Equalizer options and controls within iPadOS 27 and macOS 27 Golden Gate. This means you only need to set your custom EQ once on your iPhone, and it will automatically apply when your AirPods connect to your iPad or Mac running the respective latest operating systems. This truly exemplifies Apple's commitment to a cohesive and unified user experience across its ecosystem. On your Mac, you'll typically find these settings within the System Settings app, under the Bluetooth or Sound preferences once your AirPods are connected.
The Future of AirPods Audio: What's Next?
The introduction of a custom three-band equalizer marks a significant milestone for AirPods, moving them from a predominantly "fixed sound" device to one that offers true user personalization. This update signals a maturation of Apple's audio offerings and acknowledges the diverse preferences of its user base.
Looking ahead, this new feature opens the door to exciting possibilities for the future of AirPods audio. We might see:
- More Bands or Advanced EQ: While a three-band EQ is a great start, professional audio tools often offer five, ten, or even parametric EQs for extremely precise control. Future iterations of AirPods or iOS could introduce more frequency bands for finer tuning.
- Preset Genre EQs: Similar to what's available in Apple Music, system-wide preset EQs for various music genres (e.g., Rock, Pop, Classical, Vocal Boost) could make customization even easier for users who prefer not to manually adjust sliders.
- "Smart" or Adaptive EQ Profiles: Building upon existing features like Adaptive Audio and Personalised Spatial Audio, Apple could potentially introduce an "Intelligent EQ" that suggests or automatically adjusts based on your listening habits, hearing profile (perhaps leveraging existing audiogram data or a quick hearing test), or even ambient noise conditions.
- Deeper Integration with Health Data: As Apple continues to integrate health and accessibility features, it's not inconceivable that future audio features could tie into hearing health, offering personalized sound profiles designed to protect hearing or compensate for specific hearing characteristics.
This update firmly positions AirPods as a more versatile and "prosumer" audio device, competing more directly with established audiophile brands that have long offered extensive customization. It reinforces Apple's commitment to enhancing user experience through innovative software and powerful custom silicon.
Conclusion: Your Sound, Your Way
The arrival of a custom three-band equalizer for AirPods in iOS 27 is a game-changer for anyone who has ever wished for more control over their listening experience. This highly anticipated feature empowers you to tailor the sound of your AirPods to your exact preferences, ensuring that every song, podcast, and movie sounds precisely the way you want it to. From boosting the bass for an immersive beat to clarifying vocals for a compelling story, the power of personalized audio is now literally at your fingertips.
Remember that iOS 27, along with Apple's other upcoming software updates like iPadOS 27 and macOS 27 Golden Gate, are currently available in public beta. While stable for most users, beta software can sometimes have minor bugs. The general release of these updates, bringing this exciting EQ feature to everyone, is widely expected sometime this September. If you have compatible AirPods and are eager to experiment, follow the steps to install the beta firmware and start crafting your perfect sound today!
Dive in, experiment with the sliders, and discover a whole new dimension of audio enjoyment with your AirPods. Your ears will thank you.
This article, "Set a Custom EQ for Your AirPods in iOS 27" first appeared on MacRumors.com
Discuss this article in our forums
from MacRumors
-via DynaSage
