
10 Useful iPhone Tips and Tricks You Might Not Know About
Over the years, the iPhone's operating system, iOS, has grown incredibly powerful and feature-rich. With each new version, Apple introduces innovative capabilities, yet many of these often fly under the radar. This means your iPhone likely possesses a wealth of hidden talents that you might not even be aware of, waiting to make your daily interactions more efficient, personalized, and enjoyable.
This comprehensive guide aims to peel back the layers of complexity, revealing some of the most useful and often overlooked features built into your iPhone. From customizing your Home Screen to enhancing your privacy, these tips are designed to help you unlock the full potential of your device. We assume you have iOS 26 or a later version installed, ensuring these features are readily available to you.

Let's dive into these clever tricks that can transform how you use your iPhone every single day.
Turn an App Into a Widget
Your iPhone's Home Screen isn't just for neatly arranged app icons anymore. Widgets have transformed the way we interact with our apps, offering quick glances at information and instant access to specific functions without needing to open the full application. What many users don't realize is how simple it is to convert most of your standard app icons directly into interactive widgets, right from your Home Screen.
This functionality allows you to bring dynamic content and essential controls to the forefront, streamlining your workflow and personalizing your device's interface. Imagine seeing your next calendar appointment, the current weather forecast, or quick controls for your smart home devices immediately upon unlocking your phone. This isn't just about aesthetics; it's about making your iPhone work smarter for you.
To turn an app into a widget, simply perform a long press on any app icon on your Home Screen. A context menu will appear, and at the very top, you'll notice several square options representing different widget sizes. These typically include small, medium, and large configurations, each designed to display varying amounts of information or functionality. Tap on the square that best suits your needs, and voilà – your app icon transforms into a live widget, seamlessly integrating into your Home Screen layout.
This feature works universally with virtually any Apple app and most third-party applications that offer a widget option. Whether it's a productivity tool, a news aggregator, or a fitness tracker, if it has a widget, you can access it this way. You can even stack multiple widgets of the same size on top of each other, creating a smart stack that cycles through different information throughout the day, maximizing your Home Screen real estate.
Should you decide that you prefer the classic app icon or want to switch to a different widget size, the process is just as straightforward. Long press on the widget itself, and a menu will appear. From this menu, look for the option that represents a standard app icon, typically a smaller square or a specific "Remove Widget" or "Edit Widget" option which might lead to the choice to revert. In many cases, simply long-pressing again and selecting the top-left icon with four squares will revert it back to its standard app icon form. This flexibility ensures your Home Screen can always adapt to your changing needs and preferences, offering both immediate utility and a clean, organized appearance.
See Where You've Been
Your iPhone's Maps app is far more than just a navigation tool; it also maintains a detailed, personalized record of your travels and visits. This often-overlooked feature, "Visited Places," can be incredibly useful for recalling past experiences, remembering a fantastic restaurant you stumbled upon, or simply tracking your personal journeys. Imagine taking a spontaneous weekend trip, discovering a charming boutique or a cozy coffee shop, and then weeks later wishing you could remember its exact location. This feature solves that dilemma effortlessly.
The "Visited Places" history acts like a digital diary of your movements, allowing you to retrace your steps and rediscover places that left an impression. It’s perfect for travel enthusiasts, foodies, or anyone who wants to keep a digital log of their experiences without manually jotting them down. The data is organized in a way that makes it easy to browse and recall specific outings, adding a rich layer of memory to your daily life.
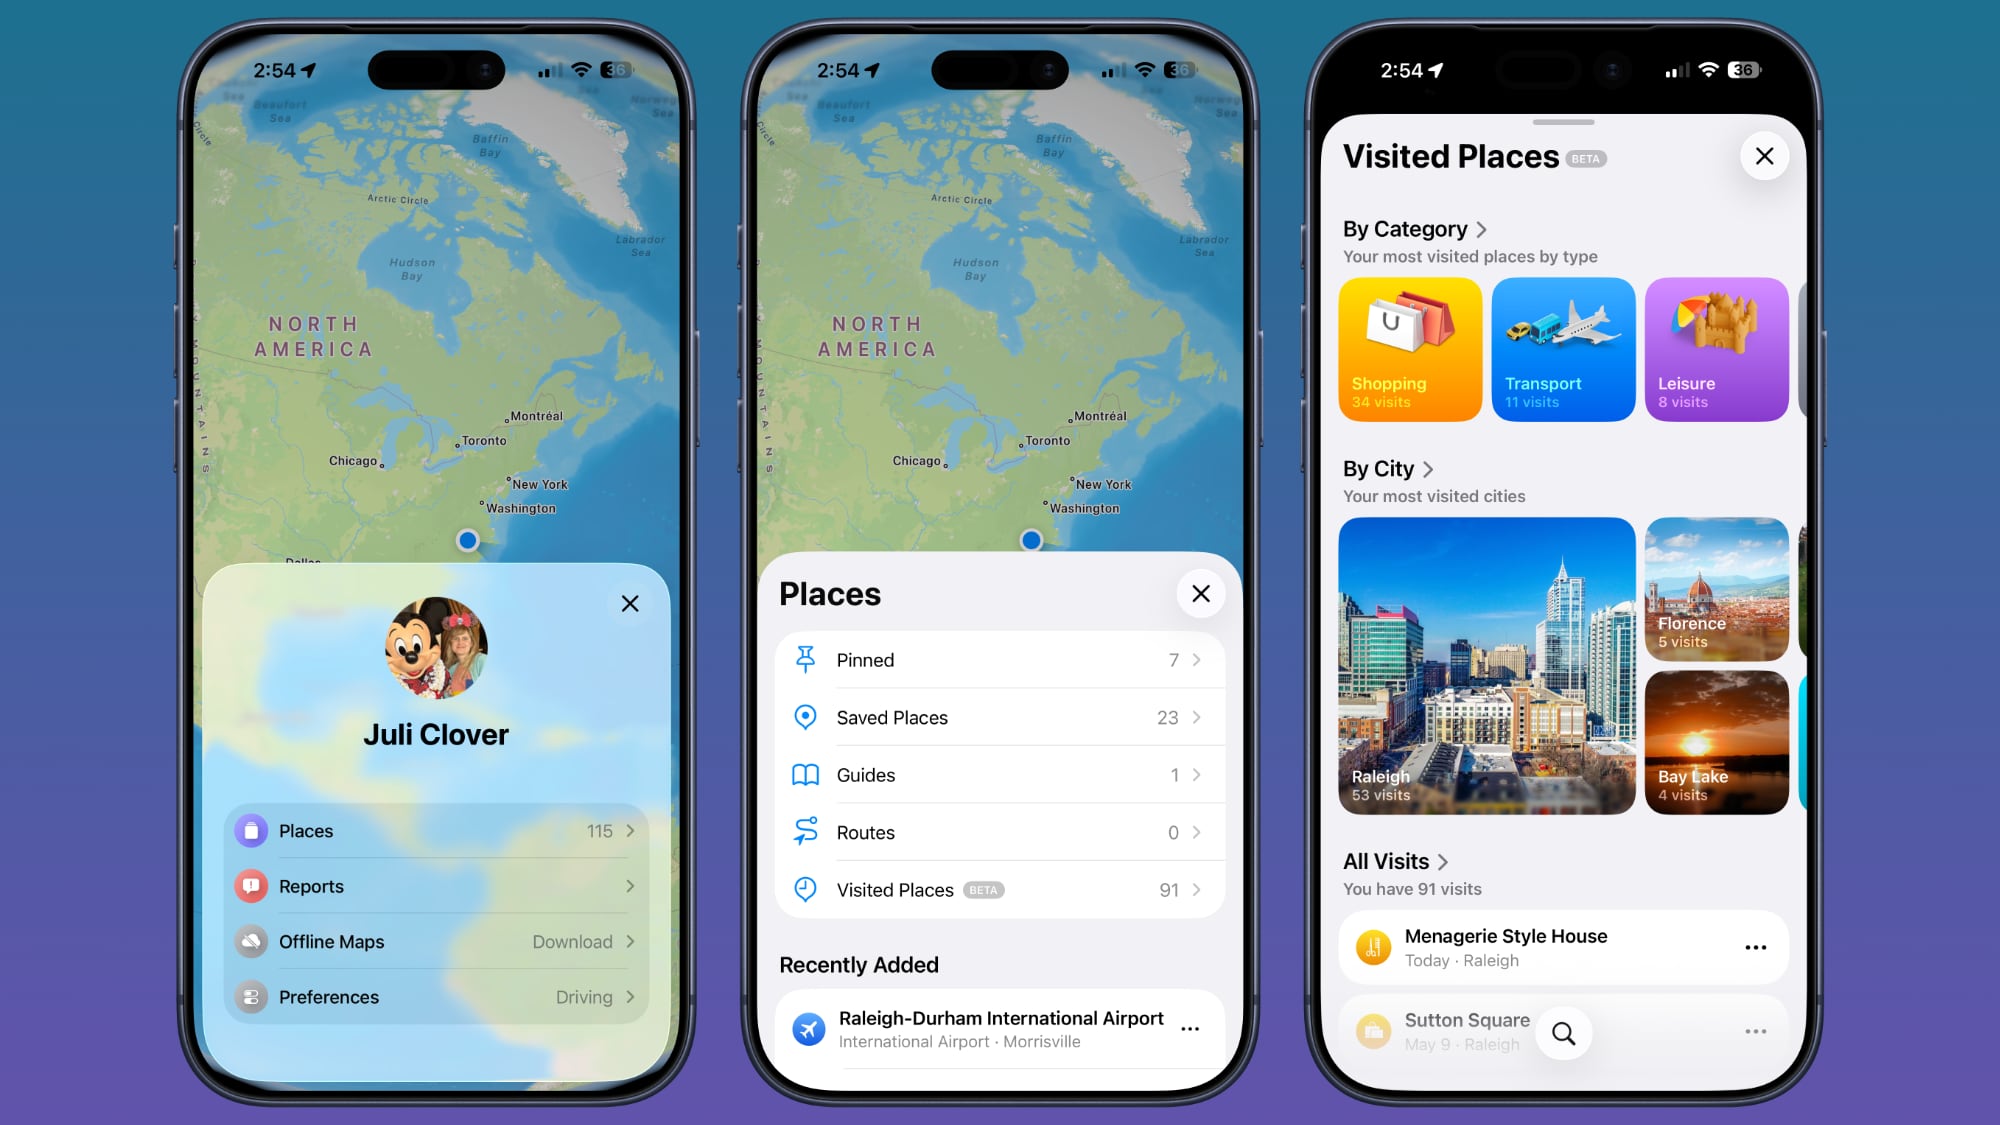
Accessing this insightful feature is straightforward. First, open the Maps app on your iPhone. In the bottom right corner, you'll typically see your profile picture or initials. Tap on this to bring up your personal Maps menu. From there, select "Places." Within the "Places" menu, you'll find the "Visited Places" option. Tapping on it will reveal a comprehensive list of locations you've been to.
What makes this feature even more practical is its intelligent organization. Your visited places aren't just a jumbled list; they are often categorized by type, such as "leisure," "shopping," "restaurants," and more. Furthermore, they are often grouped by city, making it incredibly easy to zero in on specific trips or areas you’ve explored. This thoughtful categorization helps you quickly pinpoint the exact memory or location you're searching for, whether it's the name of that incredible museum in a new city or the specific grocery store you liked in a different neighborhood.
While this feature offers great utility, Apple also provides robust controls for your privacy. If you wish to manage your history, you can easily clear your past visits. Simply scroll down to the bottom of the "Visited Places" interface, and you’ll find options to delete your history. You can choose to clear all entries or select a specific period for which visits should be kept. For those who prefer not to have this history recorded at all, you can disable the feature entirely. To do this, navigate to your iPhone's main "Settings" app, then tap on "Maps." Within the Maps settings, go to "Location" and then select "Visited Places" to toggle it off. This ensures that your movements are no longer logged, giving you complete control over your location data and privacy.
Set Custom Vibrations
We all know the convenience of setting custom ringtones or text tones for important contacts – a distinct sound that instantly tells you who’s calling or messaging without needing to look at your phone. But what if your phone is perpetually on silent, as is often the case in meetings, quiet environments, or for those who simply prefer discreet notifications? This is where custom vibration patterns come into play, offering an equally effective, yet completely silent, way to identify incoming communications.
Custom vibrations leverage the iPhone's advanced haptic engine to create unique tactile alerts. Instead of a generic buzz, you can design distinct patterns of taps and pulses for different individuals. This means you can keep your phone silent and polite, but still possess an uncanny awareness of who is trying to reach you. It’s a sophisticated and understated method for staying connected to the people who matter most, without any audible disruption to yourself or those around you.
Imagine receiving a series of short, sharp taps for your partner, a long, continuous buzz for your boss, or a rhythmic pattern for your child. These subtle distinctions, felt directly in your hand or pocket, eliminate the need to constantly check your screen, allowing you to maintain focus while remaining informed. This level of personalization is not just a neat trick; it’s a powerful productivity and privacy enhancement, giving you control over how and when you acknowledge notifications.
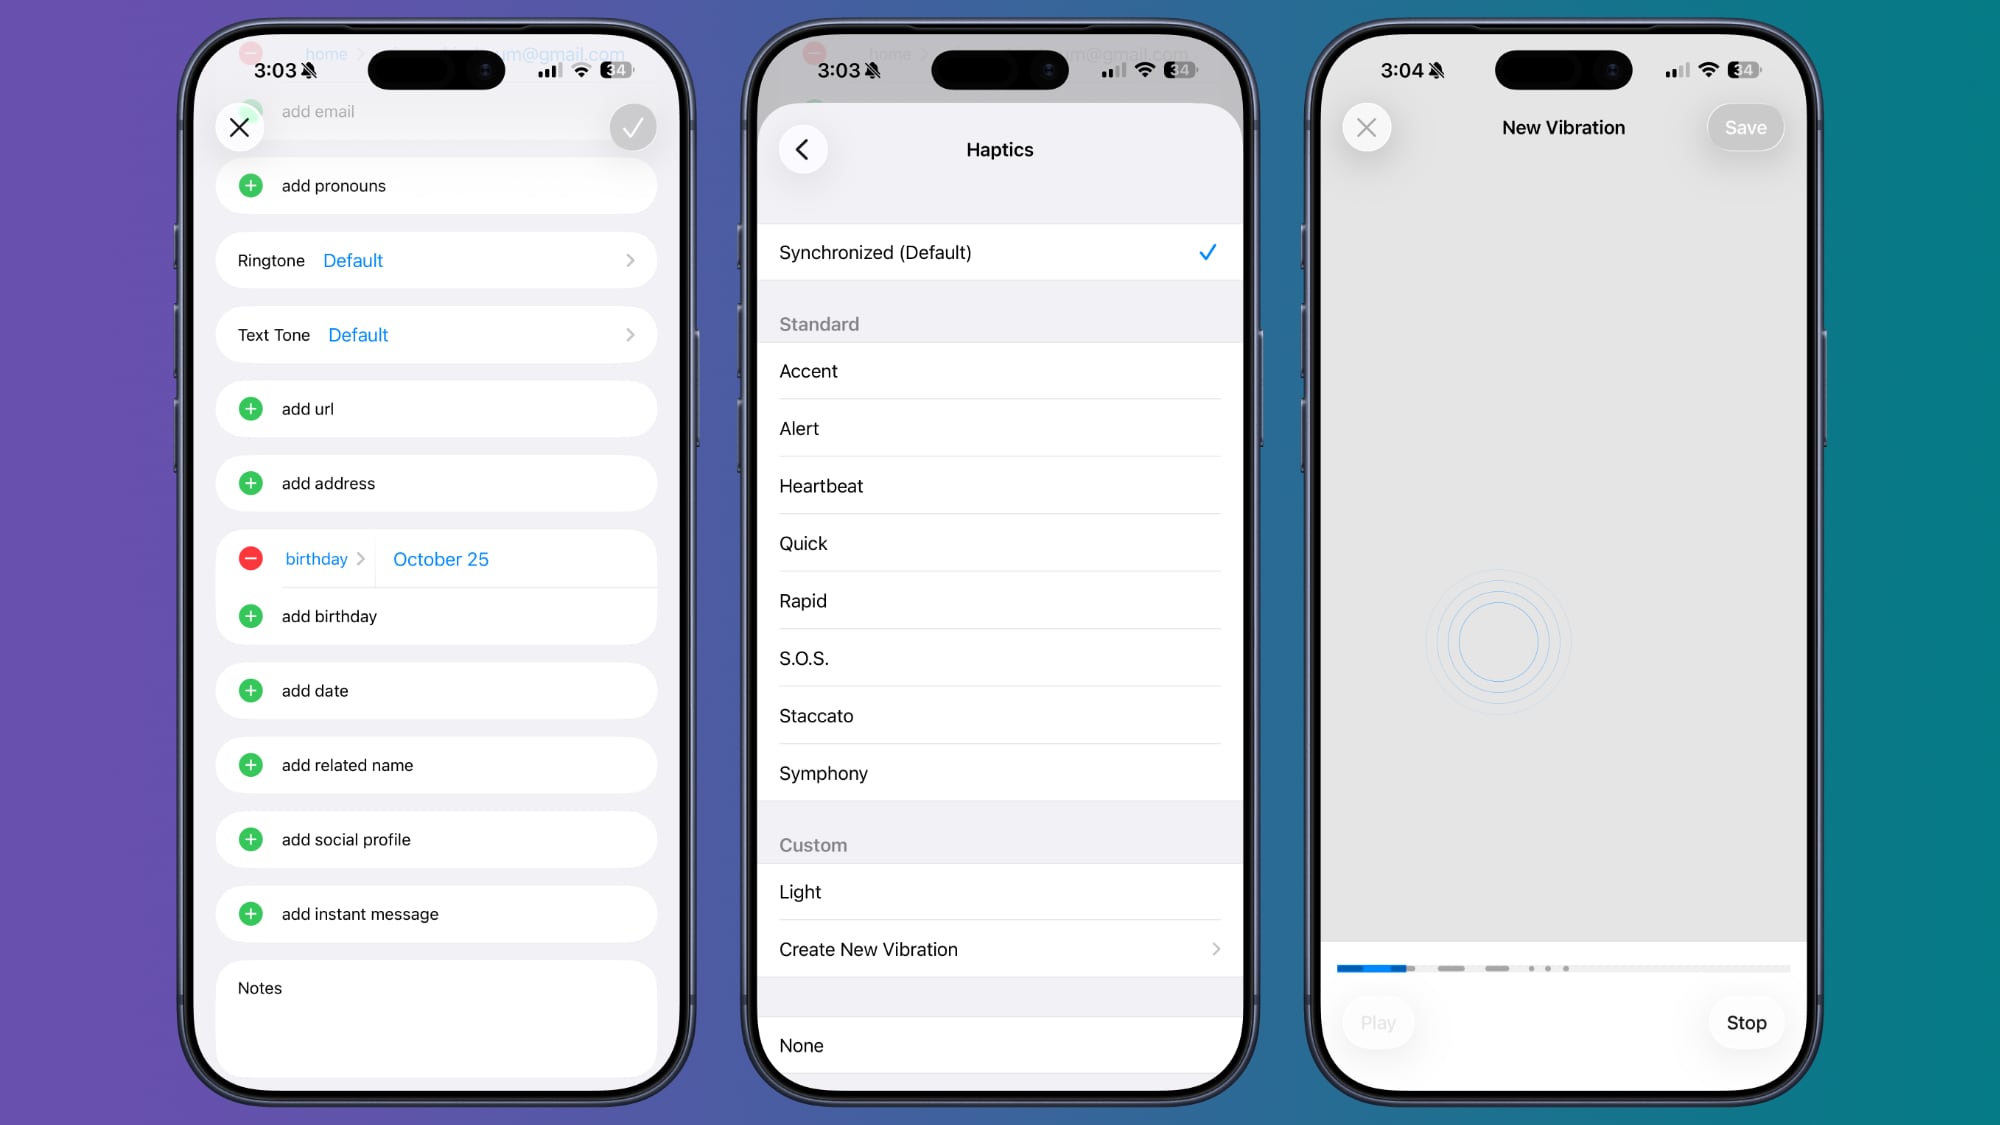
Setting up these custom vibration patterns is an intuitive process. Begin by opening the "Contacts" app on your iPhone and selecting the specific person for whom you wish to create a unique vibration. Once on their contact card, tap the "Edit" button located in the upper right corner of the screen. Scroll down until you see the "Text Tone" and "Ringtone" options. You can apply custom vibrations to either or both, depending on your preference.
Tap on "Haptics" (which you'll find within the "Text Tone" or "Ringtone" menu). Here, you'll see a list of standard vibration patterns, but more importantly, an option to "Create New Vibration." Tapping this will open a recording interface. Now, you can use your fingers to tap and press on the screen to "record" your desired vibration pattern. Experiment with quick taps, longer presses, and pauses to create a rhythm that is easily distinguishable. Once you're satisfied with your custom pattern, tap "Stop" and then "Save," giving your new haptic creation a memorable name. After saving, you can select this custom pattern from the list and assign it to your contact. From that moment on, whenever that person calls or texts, your iPhone will deliver that specific, silent alert, allowing you to instantly recognize the sender without even glancing at your screen.
Customize Your Lock Screen Buttons
For years, the iPhone's Lock Screen has featured two quick-access buttons: one for the Flashlight and another for the Camera. While undoubtedly useful, these defaults might not align with everyone's most frequent needs. What if you rarely use the flashlight but constantly need quick access to your Home app, Shazam, or a custom Shortcut? iOS 26 liberates these buttons, allowing you to customize them to any function available in Control Center, including options from your favorite third-party apps.
This customization transforms your Lock Screen from a static gateway into a dynamic command center tailored precisely to your workflow. Imagine the convenience of instantly controlling your smart lights, scanning a QR code, or initiating a voice memo with just a tap, all without having to unlock your phone or even swipe into Control Center. This level of personalized access makes your iPhone significantly more efficient and responsive to your immediate demands.
The ability to swap out these default icons means you can truly make your iPhone feel like an extension of your personal habits and priorities. Whether you're a quick note-taker, a smart home enthusiast, or someone who frequently uses specific accessibility features, you can now place those functions literally at your fingertips from the moment your screen lights up. It’s a subtle change with a significant impact on your daily productivity and overall user experience.
To customize your Lock Screen buttons, begin by going to your Lock Screen. Then, perform a long press anywhere on the screen. This action will activate the customization interface, similar to how you edit your wallpapers. You'll see options to either "Customize" your current wallpaper and Lock Screen or to create a completely new one using the "+" button. Tap on "Customize" if you wish to modify your existing setup, or create a new one if you want to experiment without affecting your current Lock Screen.
Once in the customization editor, you'll notice the Flashlight and Camera icons (or whatever you currently have assigned) at the bottom left and right of the screen. To remove one of these, simply tap on the small "-" (minus) button that appears over the icon. Once removed, you’ll see a "+" (plus) button in its place. Tap this "+" button to open a menu of available options. This menu will display a wide array of Control Center functions, including both Apple's built-in tools and any compatible third-party app shortcuts you have enabled in Control Center. Browse through the list, select the function you want to assign to that button, and then tap "Done" in the upper right corner to save your changes. You can repeat this process for both the left and right buttons, ensuring your Lock Screen provides instant access to the tools you use most often, making every interaction more efficient.
Back Tap Gestures
Back Tap is one of those hidden gems within iOS that, once discovered, often becomes an indispensable part of your iPhone usage. Introduced as an accessibility feature, it has evolved into a powerful shortcut tool for everyone. Back Tap allows you to trigger various actions by simply double or triple tapping the back of your iPhone. It’s an incredibly intuitive, discreet, and fast way to execute commands, turning the entire back of your device into a giant, customizable button.
The beauty of Back Tap lies in its versatility. It can handle simple system functions like snapping a screenshot or turning on the flashlight, but its true power is unleashed when integrated with custom Shortcuts you’ve created. This means the possibilities are virtually endless – from launching your favorite app, toggling a specific setting, or even initiating a complex sequence of actions with just a few taps on the back of your phone. It offers a convenient solution for single-handed operation, or when you need to perform an action without looking at or precisely touching the screen.
Imagine needing to quickly jot down a thought with a voice memo, but your hands are full. A quick double-tap on the back of your iPhone and your recording app is open and ready. Or perhaps you’re scrolling through a long article and want to jump to the top without reaching for the status bar; a triple-tap can instantly scroll you up. This level of physical interaction adds a whole new dimension to how you control your device, making common tasks feel effortless and natural.
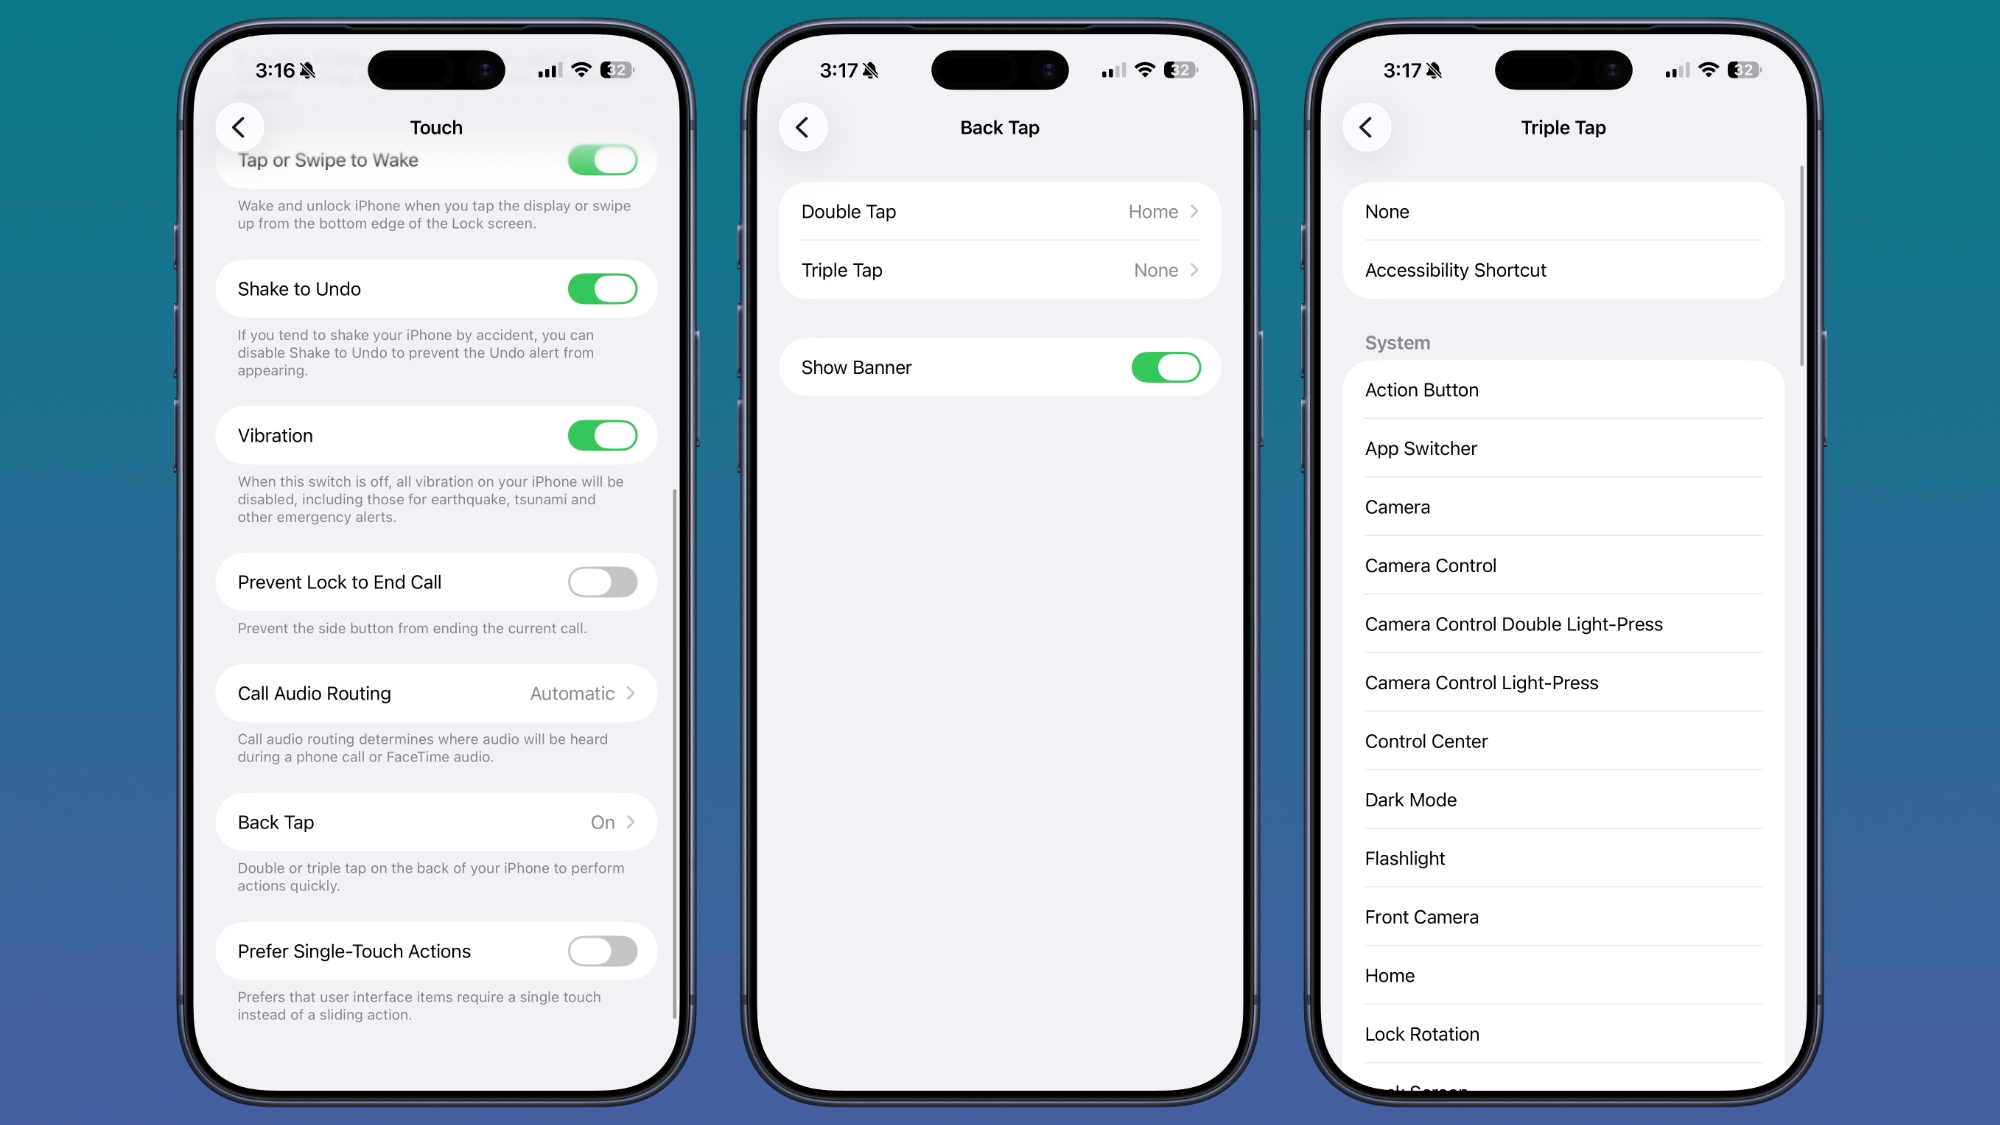
Setting up Back Tap is straightforward, nestled within your iPhone’s accessibility settings. To configure this feature, open your "Settings" app, then navigate to "Accessibility." Within the Accessibility menu, tap on "Touch," and then scroll all the way down until you find "Back Tap." Once you tap on "Back Tap," you'll be presented with two distinct options: "Double Tap" and "Triple Tap." Each of these gestures can be assigned a separate action, effectively giving you two additional customizable buttons on your iPhone.
When you select either "Double Tap" or "Triple Tap," you'll see a comprehensive list of actions you can assign. This list includes a wide range of system functions such as "Screenshot," "Flashlight," "Lock Screen," "Home," "Control Center," "Notification Center," and volume controls. It also offers various accessibility features like "AssistiveTouch" or "Magnifier." The most exciting aspect, however, is the integration with "Shortcuts." If you’ve created any custom shortcuts in the Shortcuts app, they will appear here, allowing you to trigger them instantly. Choose your preferred action for both the double tap and triple tap gestures, and then exit the settings. Now, simply tap the back of your iPhone twice or three times, and watch your chosen action come to life, demonstrating the seamless power of this underrated feature.
Screenshot a Webpage
Taking a screenshot of your iPhone's display is a fundamental feature that almost everyone uses regularly. However, the standard screenshot only captures what's visible on your screen at that precise moment. What if you need to save an entire article, a lengthy recipe, a full PDF document, or a detailed online receipt that scrolls far beyond a single screen? Constantly taking multiple screenshots and stitching them together is tedious and inefficient. Fortunately, iOS offers a brilliant solution: the "Full Page" screenshot.
This powerful feature allows you to capture an entire scrolling document or webpage as a single, continuous image, transforming it into a neatly organized PDF file. It's an invaluable tool for researchers, students, online shoppers, or anyone who frequently needs to save comprehensive digital content for later reference, offline reading, or sharing. Instead of fragmented images, you get one complete, easy-to-manage document.
Imagine coming across a long-form article in Safari that you want to read later on a commute without an internet connection, or needing to save an entire bank statement that's displayed online. The Full Page screenshot eliminates the hassle and ensures you capture every single detail, from top to bottom, in a single, coherent file. This not only saves time but also improves the readability and organization of your captured content.
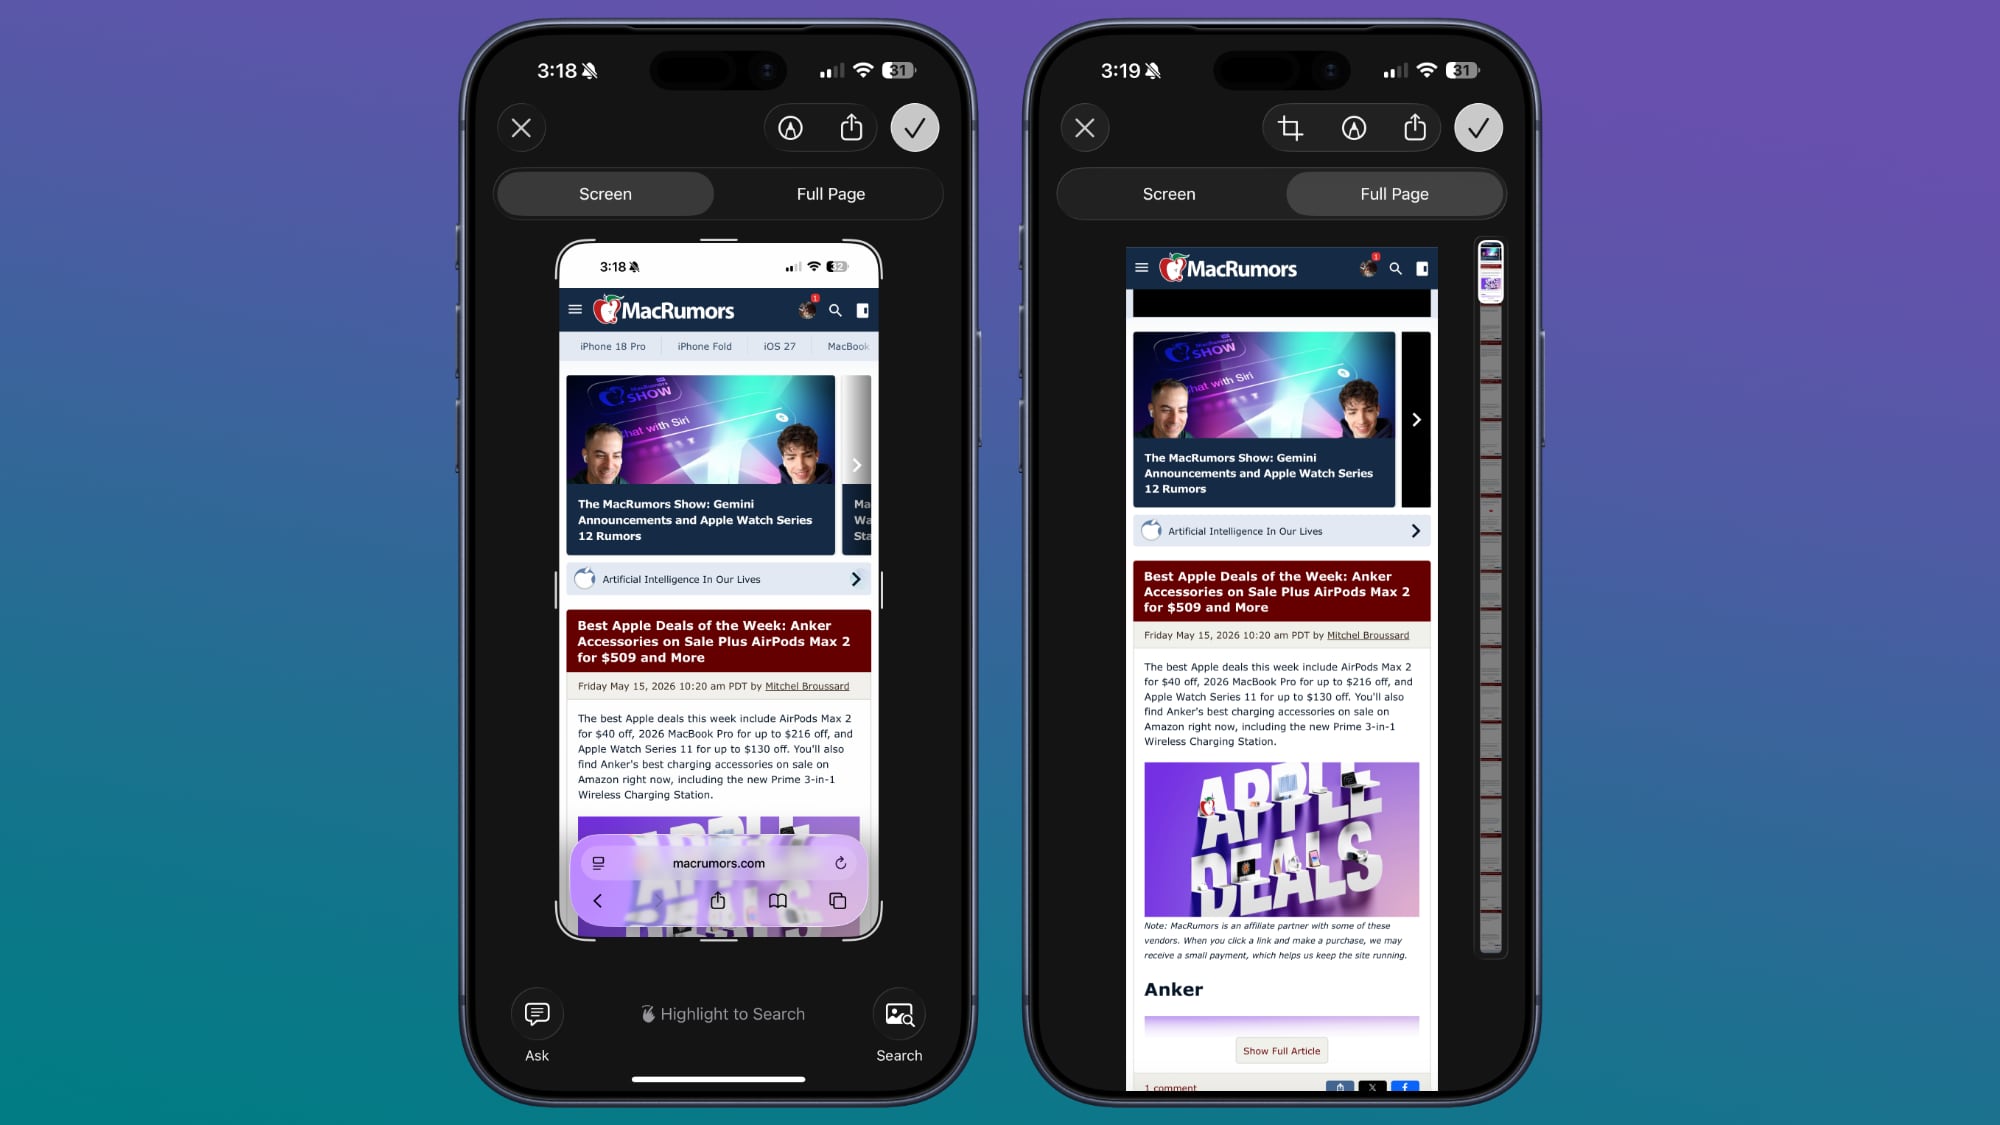
To use this feature, start by taking a screenshot as you normally would: simultaneously press the side button (or top button on older models) and the volume up button. After capturing the screenshot, a small thumbnail preview will briefly appear in the bottom-left corner of your screen. If you have full-screen previews turned off, you'll need to tap this thumbnail before it disappears. If you have full-screen previews on, it will automatically open the screenshot editing interface.
Once you are in the screenshot editing interface, look at the top of the screen. You'll typically see two tabs: "Screen" (which is the default view) and "Full Page." Tap on "Full Page." The display will then show you a scrollable preview of the entire webpage or document, extending beyond the original screen capture. You can scroll through this preview to ensure everything you need is included. On the right side, there will be a slider that indicates how much of the page you've captured. After confirming your full-page capture, tap "Done" in the upper left corner. You'll then be given the option to "Save PDF to Files." Select this, choose your desired folder within the Files app, and tap "Save." Your complete webpage or document is now saved as a single, continuous PDF, ready for offline viewing, sharing, or archiving, providing a seamless way to preserve extensive digital content.
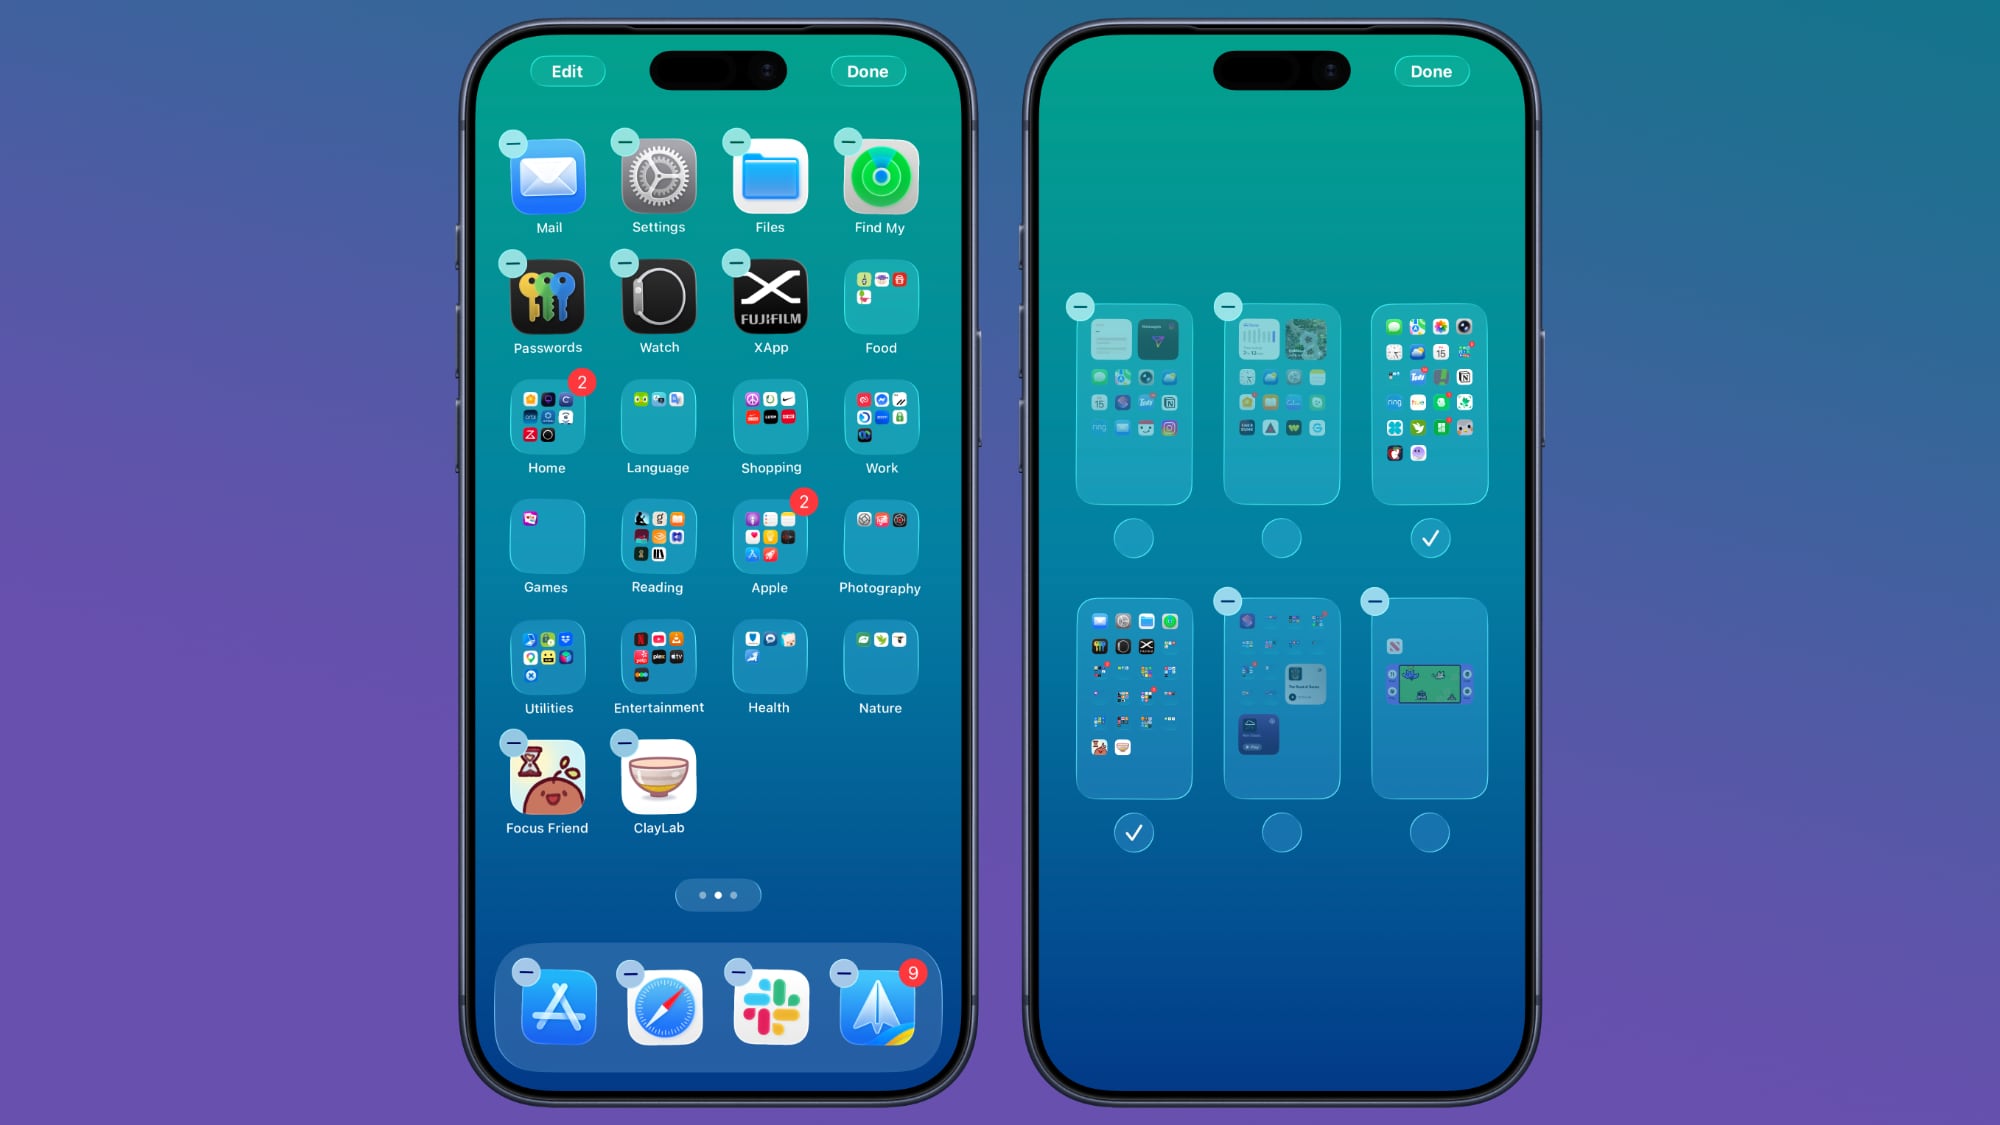
Hide Apps
Maintaining a clean, organized, and private Home Screen is key to an efficient iPhone experience. Over time, our devices can accumulate numerous apps, some of which we use infrequently, or others we simply prefer to keep out of immediate view for privacy or aesthetic reasons. iOS provides robust features to hide apps and even entire app pages, helping you declutter your Home Screen, reduce distractions, and enhance your digital privacy without actually deleting any applications.
There are two primary ways to hide apps: individually, by sending them to your App Library, or by hiding entire pages of apps from your Home Screen. Both methods contribute to a more personalized and streamlined interface. Hiding apps is particularly useful for those who want to separate work and personal applications, keep sensitive apps out of sight, or simply embrace a minimalist Home Screen design. It ensures that your most frequently used apps are easily accessible, while less critical ones remain available but tucked away.
One common reason for hiding apps is to minimize distractions. You might have social media apps or games that you only want to access during specific times, or utility apps that you use so rarely they don’t warrant a permanent spot on your main screens. By hiding them, they remain installed and fully functional, but no longer contribute to visual clutter or temptation. This approach supports digital wellbeing by giving you more control over your app visibility.
To hide individual apps, simply long press on the app icon you wish to hide. A context menu will appear. From this menu, select the option to "Remove App." Don't worry, this doesn't delete the app! Instead, you'll be given a choice to "Delete App" or "Remove from Home Screen." Choose "Remove from Home Screen," and the app will be sent to your App Library, where it will still be fully accessible via search or by browsing its category. If you have Face ID or a passcode enabled, you might also see an option related to Face ID for privacy, depending on specific app settings.
For a more dramatic decluttering, you can hide entire Home Screen pages. This is perfect if you have a page dedicated to work apps that you only need visible during office hours, or a page of experimental apps you’re trying out. To hide an app page, long press on an empty area of your Home Screen until all the app icons start to "jiggle" – this is known as jiggle mode. While in jiggle mode, you'll see a row of dots at the bottom of your display, each representing a Home Screen page. Tap on these dots. This will open a view showing all your Home Screen pages as thumbnails, each with a small checkbox underneath. Simply uncheck the box for any page you want to hide from view. Once unchecked, that entire page will disappear from your Home Screen rotation. Tap "Done" in the upper right corner to exit jiggle mode and save your changes.
Apps hidden in this way are not deleted and do not appear in a special "Hidden" folder within the App Library, unlike some other privacy features. They are simply moved off your immediate Home Screen view. You can still easily find them using Spotlight Search (swipe down from the middle of your Home Screen) or by navigating to their appropriate category within the App Library. To unhide an app page, simply repeat the steps: long press on the Home Screen, tap the dots, and then re-check the box next to the page you wish to bring back. This flexibility allows you to customize your iPhone's interface to precisely match your needs and preferences at any given moment, ensuring a cleaner, more focused experience.
Quick Set a Timer
Timers are incredibly versatile tools, whether you're boiling an egg, doing a quick workout, taking a short break, or managing your study sessions. While the Clock app provides full timer functionality, sometimes you need to set a quick timer without the fuss of opening an app, navigating menus, and inputting precise minutes and seconds. iOS offers a brilliantly swift way to do this directly from Control Center, transforming a common task into a seamless, one-tap-and-slide operation.
This quick timer feature is all about efficiency and convenience. It eliminates unnecessary steps, allowing you to activate a timer almost instantly, which is perfect for moments when every second counts or when you simply don't want to get bogged down in app navigation. Imagine your hands are messy from cooking, or you're in the middle of an intense activity; this rapid access to a timer proves invaluable.
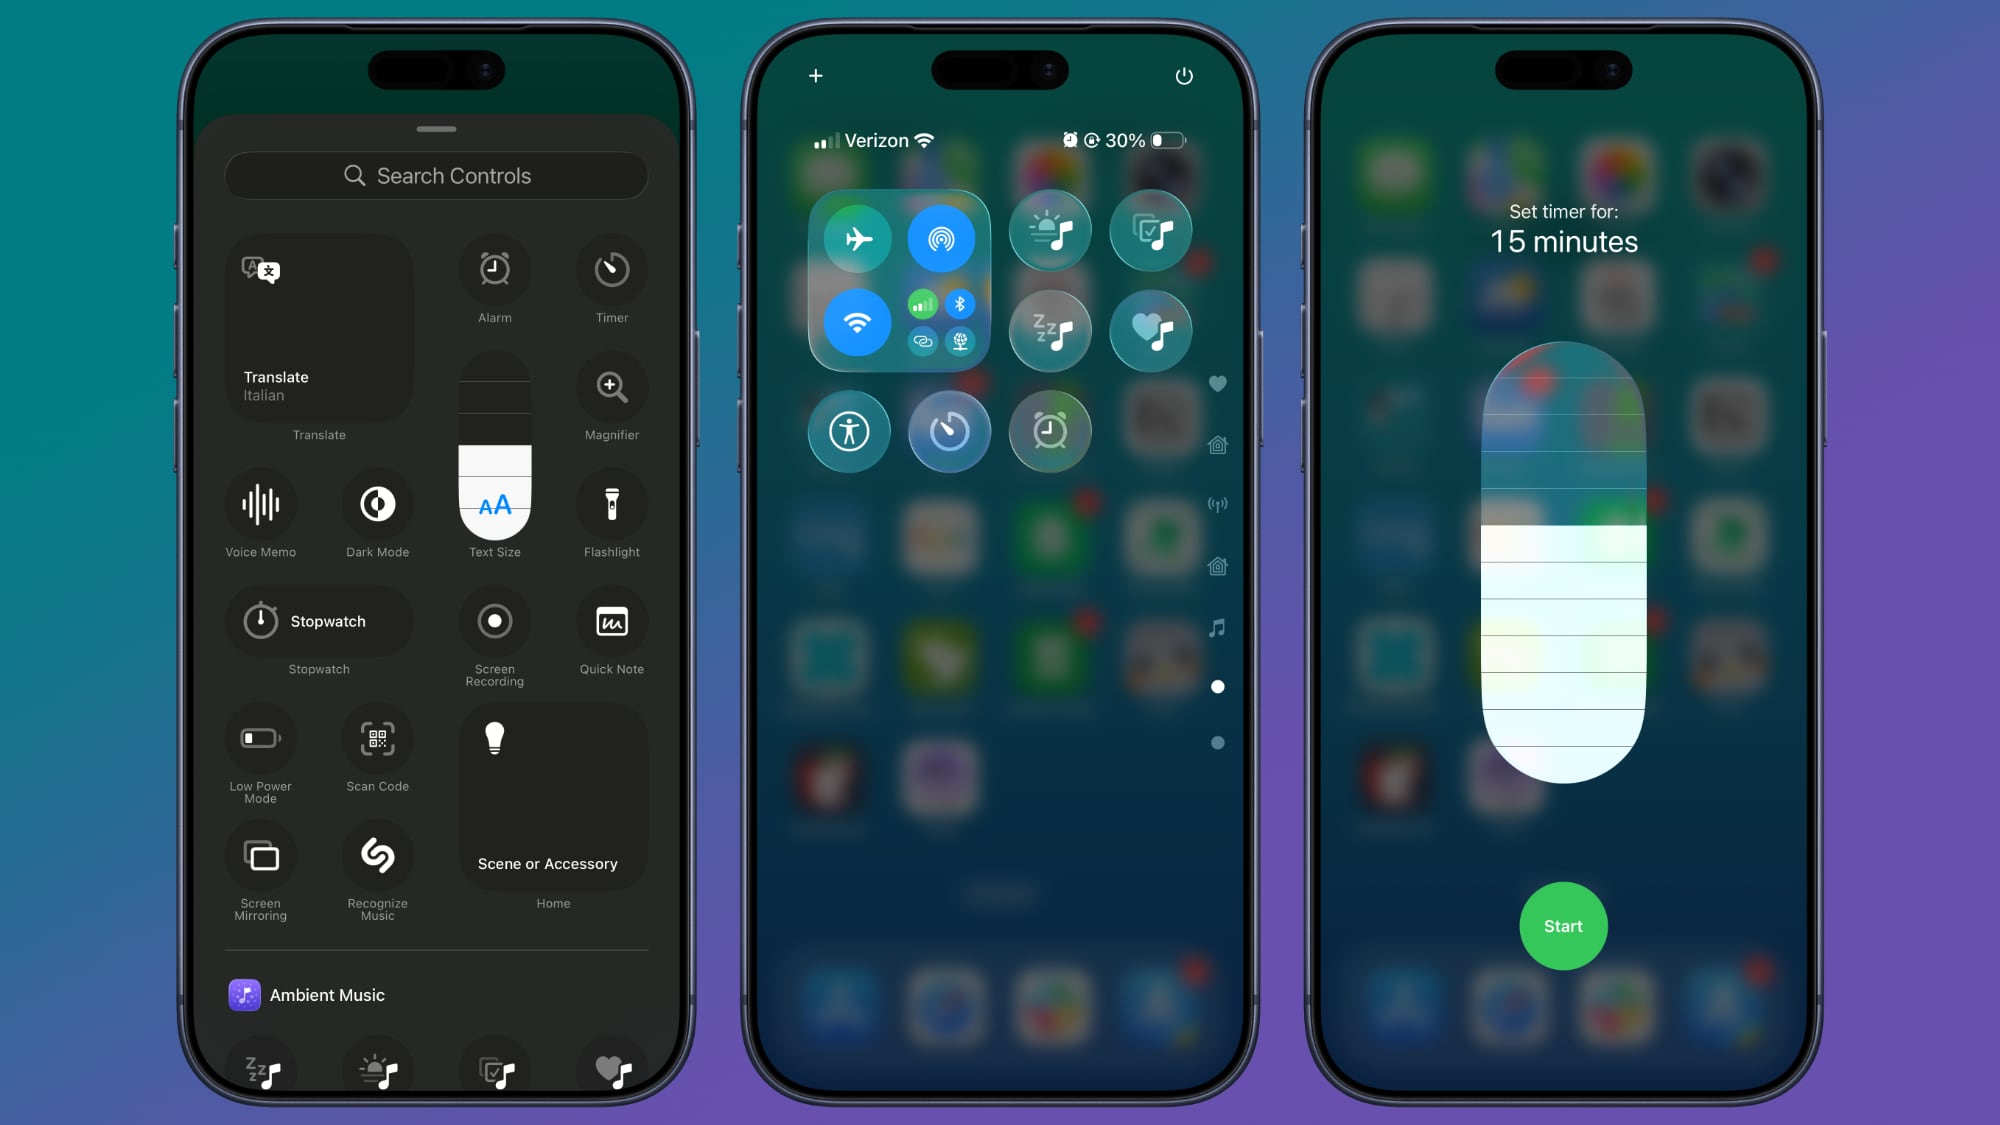
The ability to integrate a slider for timer selection directly into Control Center significantly reduces friction in your daily routine. Instead of fumbling through the Clock app, you can simply swipe down (or up, depending on your iPhone model), long-press, and select a duration, all in one fluid motion. This seemingly small improvement has a big impact on how you manage short-term tasks and time-sensitive activities, making your iPhone even more responsive to your immediate needs.
To enable and use this quick timer feature, you first need to ensure the Timer option is added to your Control Center. If it’s not already there, open your iPhone's main "Settings" app, then tap on "Control Center." Here, you'll see a list of "Included Controls" and "More Controls." Scroll down to "More Controls" and locate the "Timer" icon (it typically looks like a stopwatch). Tap the green "+" button next to it to add it to your "Included Controls." Now, the Timer shortcut will appear in your Control Center.
With the Timer icon added to Control Center, using it is incredibly fast. Swipe down from the top-right corner of your screen (for iPhones with Face ID) or swipe up from the bottom edge (for iPhones with a Home button) to open Control Center. Locate the Timer icon and perform a long press on it. Instead of just opening the Clock app, a specialized interface will pop up, featuring a user-friendly slider. This slider allows you to quickly adjust the timer duration from a minimum of one minute up to a maximum of two hours, with common intervals in between. Simply drag the slider to your desired time – for example, 5 minutes, 10 minutes, 30 minutes, or 1 hour. Once you’ve selected the time, tap the "Start" button, and your timer will begin counting down immediately. This method is exceptionally convenient for setting ad-hoc timers without the need to fully engage with the Clock app, making it one of the most efficient ways to manage your time on the go.
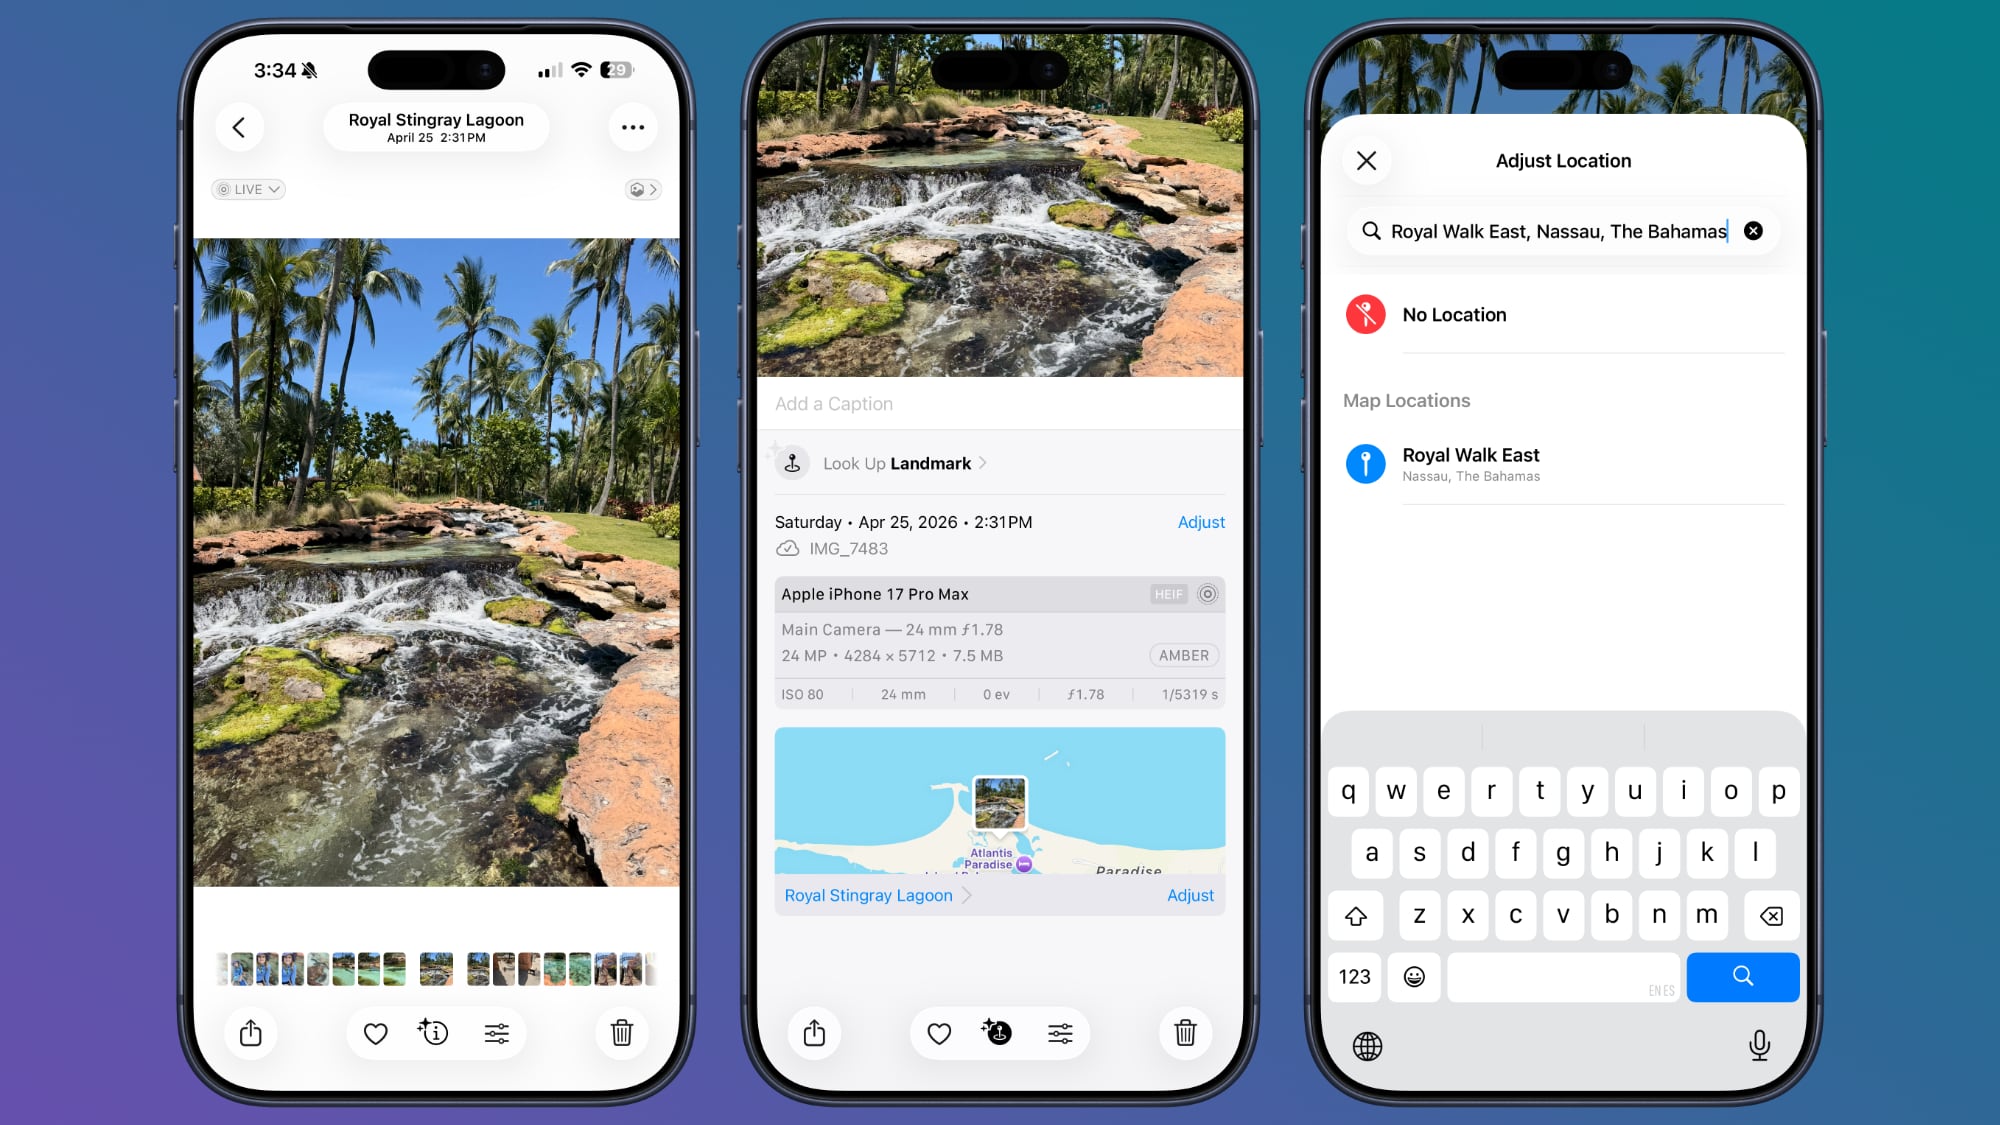
Remove Photos Location Data
In our increasingly connected world, sharing photos is a daily occurrence, but with convenience comes the responsibility of protecting our privacy. Every photo you take with your iPhone embeds a wealth of metadata, including the precise geographic location (geotagging) where the picture was captured. While this can be useful for organizing your memories, it can also pose a privacy risk when sharing photos with others or posting them online. Fortunately, iOS provides robust, easy-to-use tools to remove this sensitive location data before you share, ensuring your personal whereabouts remain private.
Understanding photo metadata is crucial. Beyond location, photos can also store information about the device used, date and time, and camera settings. The location data, however, is often the most sensitive, as it directly reveals where you’ve been. Sharing a photo with geotags enabled could inadvertently disclose your home address, workplace, or the specific location of your children’s school, making you vulnerable to privacy breaches or security concerns. Removing this information is a simple yet powerful step towards safer digital sharing.
This privacy feature is particularly valuable when you're posting photos to social media, sending them to people you don't know intimately, or using them in public forums. It gives you complete control over what information accompanies your images, allowing you to enjoy the benefits of photo sharing without compromising your personal safety or the privacy of your loved ones. Apple has integrated this functionality directly into the Photos app, making it incredibly intuitive to manage your image data.
There are two convenient methods to remove location data from your photos, giving you flexibility depending on when you decide to take action. The first method allows you to adjust the location data directly within the Photos app, even before you initiate sharing.
To use this method, open the Photos app and select the image from which you want to remove the location data. Once the photo is open, swipe up on the image. This action will reveal additional information and options related to the photo, such as the date, time, and typically, a small map showing its captured location. Look for the "Adjust Location" option and tap on it. A menu will appear with choices like "No Location" or "Revert." Select "No Location" to strip the precise GPS coordinates from that specific photo. This change will be saved, and the photo will no longer carry location data for future sharing.
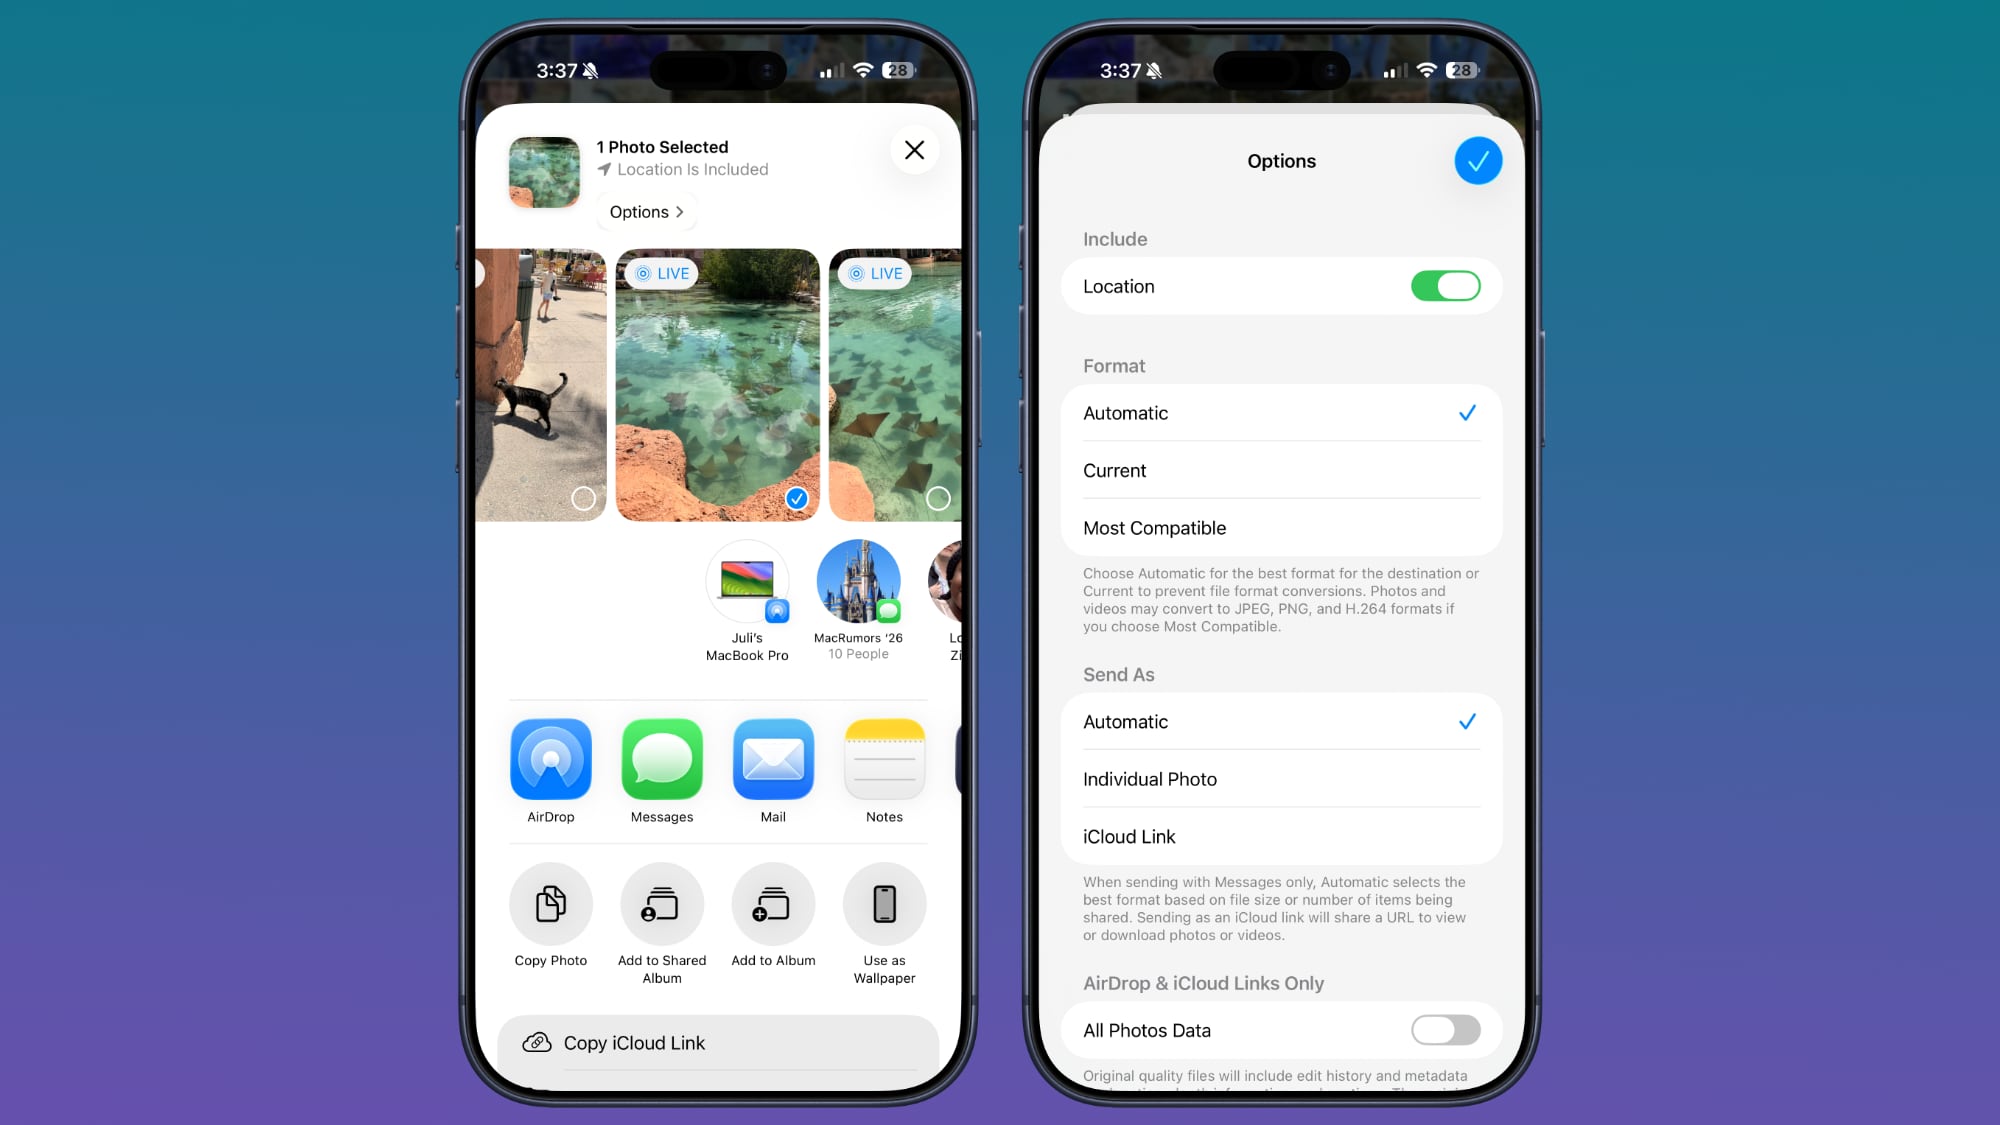
The second method is arguably even more convenient as it allows you to remove location data precisely at the moment you're about to share a photo, ensuring you never accidentally transmit sensitive information. To use this, select the photo (or multiple photos) you wish to share, then tap on the standard "Share" button (the square with an arrow pointing upwards) typically found in the bottom left corner.
Before you choose a sharing destination (like Messages, Mail, or a social media app), look at the top of the Share Sheet. You'll see a small "Options" button. Tap on "Options." Within this menu, you’ll find toggles for various types of metadata, including "Location." Simply toggle off the "Location" switch. You might also see other options like "All Photos Data" or "Captions" which you can also disable if you wish to share an image with minimal associated data. Once you've toggled off "Location," tap "Done." Now, proceed to share your photo as usual. The image will be sent without any geographical information attached, giving you peace of mind that your privacy is protected. This integrated approach makes managing your photo privacy an effortless and automatic part of your sharing routine, enhancing your digital security without any complex steps.
Use a Timer to Turn Off Media
Many of us enjoy unwinding with music, podcasts, or audiobooks as we drift off to sleep. While this can be incredibly relaxing, there's a common dilemma: leaving media playing all night can drain your iPhone's battery and potentially disrupt your sleep cycle if you wake up to sound. The good news is that your iPhone has a built-in "sleep timer" functionality, cleverly hidden within the Clock app's timer feature, which allows you to automatically stop any playing media after a specified duration. This is an excellent way to ensure your media experience enhances, rather than detracts from, your rest and device longevity.
This "Stop Playing" timer is incredibly versatile, working with virtually any audio or video content on your iPhone. Whether you're listening to a curated sleep playlist, catching up on an engaging podcast, immersing yourself in an audiobook, or even watching a show with headphones on, this feature gives you precise control over playback duration. It's a thoughtful utility for mindful media consumption, helping you conserve battery life and maintain a peaceful environment after you've fallen asleep.
Think of it as a personal assistant that gently turns off your entertainment once you've reached your desired listening or viewing period. This prevents you from waking up in the middle of the night to ongoing audio, and it ensures your device isn't unnecessarily consuming power. It’s a small adjustment that can lead to a more restful night and a more charged phone in the morning, making it a valuable habit for nightly routines.
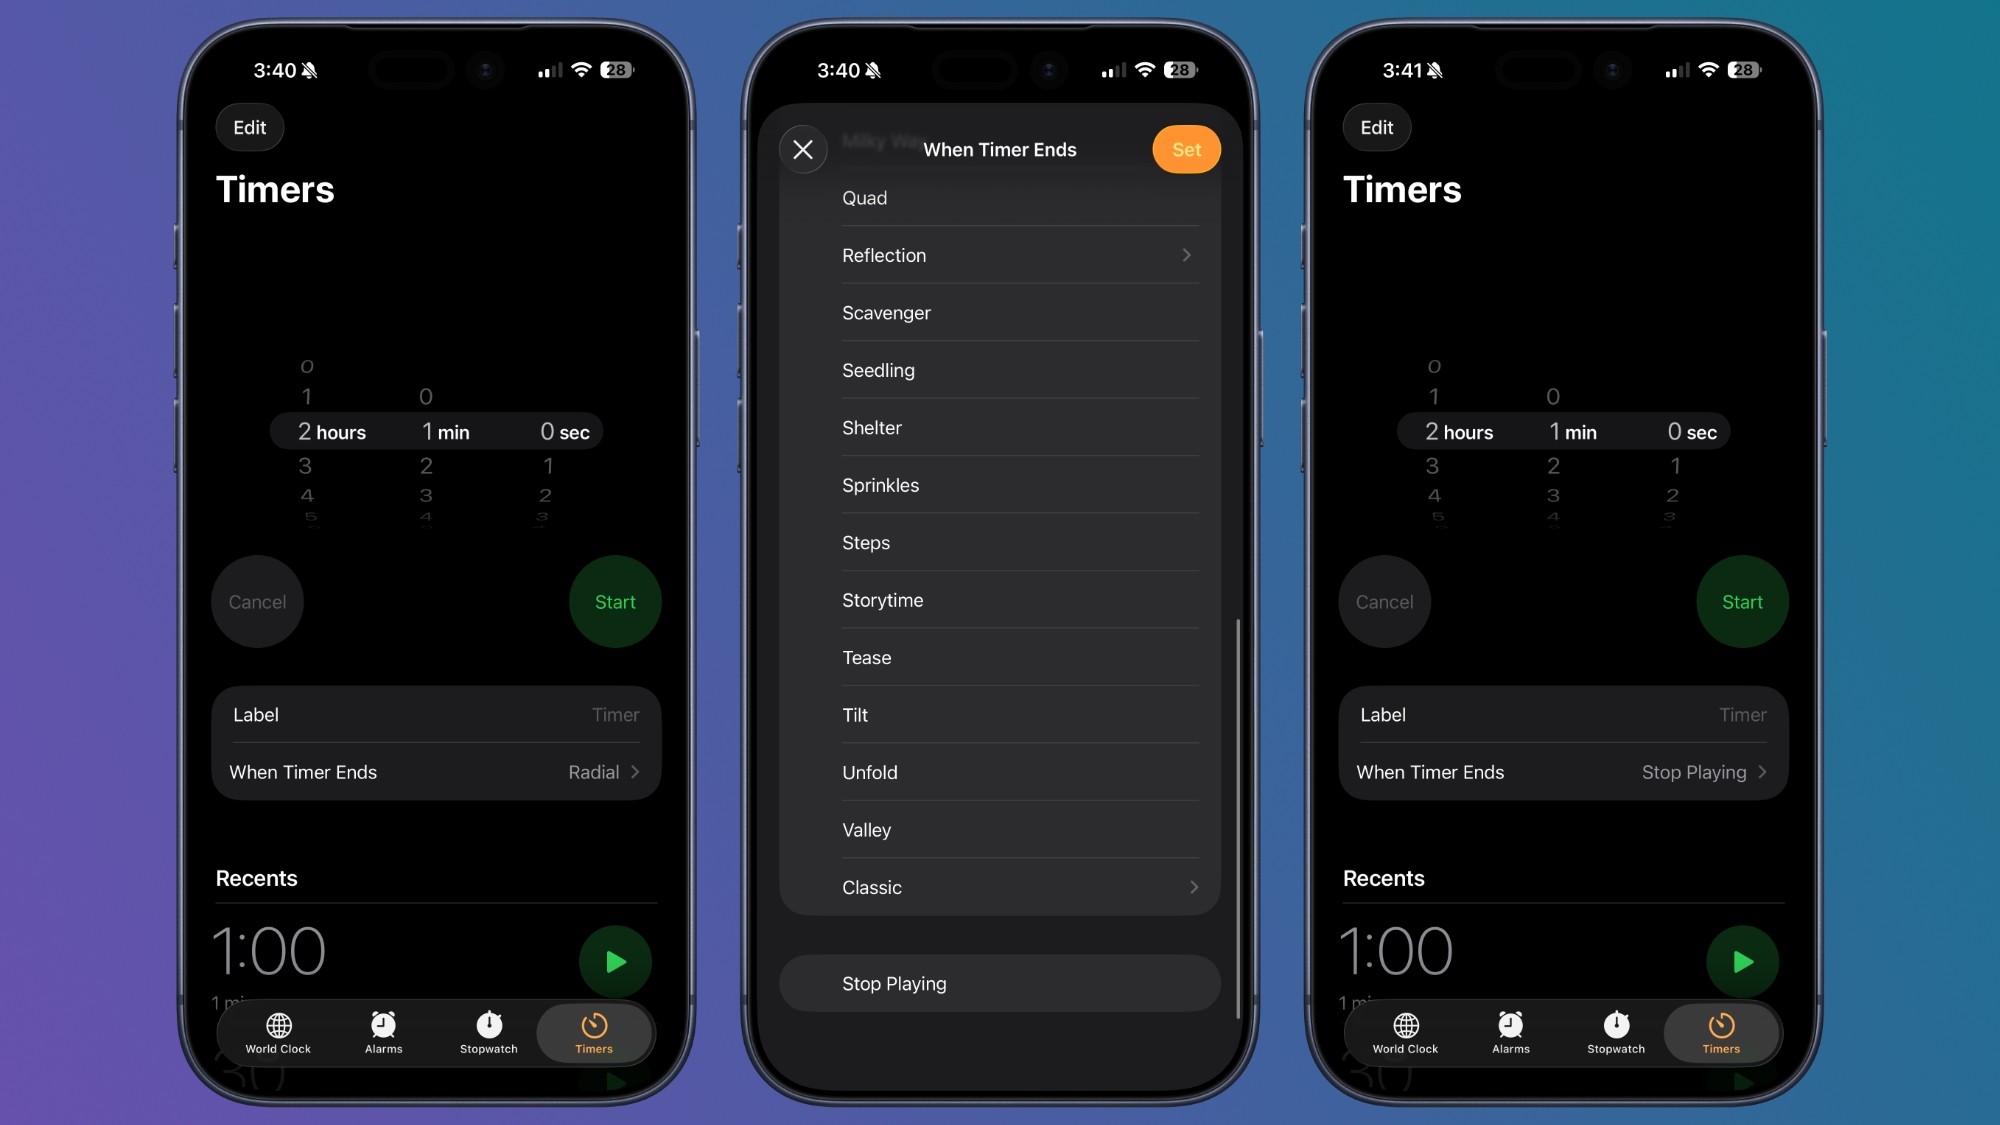
Setting up this media-stopping timer is surprisingly simple and resides within the "Clock" app, a place you might not typically associate with media controls. Here’s how to enable it:
First, open the "Clock" app on your iPhone. At the bottom of the screen, you'll see several tabs: World Clock, Alarm, Stopwatch, and Timer. Tap on the "Timer" tab to access the timer settings. Here, you’ll set the duration for how long you want your media to play before it automatically stops. Use the hour, minute, and second selectors to set your desired time period – for example, 30 minutes, 45 minutes, or 1 hour.
Once you’ve set your preferred time, don't tap "Start" yet. Instead, look for the option labeled "When Timer Ends." Tap on this. By default, this option is usually set to play a sound or ringtone. However, if you scroll all the way down to the bottom of the list of alert sounds, you'll find a special option: "Stop Playing." Select "Stop Playing." After choosing this, tap "Set" in the top right corner to confirm your selection. Now, return to the main Timer screen and tap "Start." Any music, podcasts, audiobooks, or other media you have playing will continue for the duration you set, and once the timer goes off, the playback will automatically cease. This clever feature turns your iPhone's standard timer into a sophisticated sleep aid, offering a seamless way to manage your media consumption for better rest and improved battery life.
More Tips
The iPhone is a device packed with endless possibilities, and the tips above merely scratch the surface of its capabilities. Apple continually refines iOS, adding new features and subtle improvements that can significantly enhance your daily digital life. By exploring these hidden functions and customizing your device, you can transform your iPhone into an even more powerful and personalized tool.
We hope these insights have opened your eyes to new ways of interacting with your iPhone, making your experience smoother, more private, and more efficient. Whether it's streamlining your Home Screen, protecting your location data, or optimizing your media consumption, mastering these lesser-known tricks empowers you to get the most out of your Apple device.
Do you have a favorite iPhone tip or a clever trick that most people might not know about? Share your wisdom and insights in the comments section below! Your unique discoveries could help other iPhone users unlock even more potential from their devices and make their daily interactions even better.
This article, "10 Useful iPhone Tips and Tricks You Might Not Know About" first appeared on MacRumors.com
Discuss this article in our forums
from MacRumors
-via DynaSage
