
How to Downgrade From the iOS 26 Beta to iOS 18
Downgrading from iOS 26 Beta or iPadOS 26 Beta: A Comprehensive Guide
Apple's beta software, while offering early access to new features, can sometimes be unstable. If you've installed the iOS 26 or iPadOS 26 beta via the Apple Developer Program or Public Beta Program and are experiencing issues like app malfunctions, poor battery life, frequent crashes, or unexpected behavior, you might want to downgrade to the stable iOS 18 release. This guide will walk you through the process.
Early beta releases are known for their instability. It's completely normal to encounter bugs and unexpected behavior. Before proceeding, it's crucial to understand that downgrading will erase all data on your device unless you've created a backup.
The Importance of Backups
Before you begin the downgrade process, it’s strongly recommended to have a backup of your device. If you created a backup before installing the iOS 26 beta, you can restore your device to its previous state, preserving your data, apps, and settings. You can learn how to create a backup here. However, if you didn't create a backup, downgrading will result in a completely clean device, requiring you to set it up as new and reinstall your apps.
It's also important to note the implications for your Apple Watch. If you've updated your Apple Watch to watchOS 26, it won't be compatible with your iPhone after downgrading to iOS 18. Downgrading watchOS is not a user-friendly process; it typically requires contacting Apple support for assistance.
Step-by-Step Guide to Downgrading from iOS 26 Beta
This process involves putting your device into recovery mode and restoring it to the stable iOS 18 release. Remember to back up your data first, if possible. Let's get started:
- Connect your iPhone or iPad: Connect your iPhone or iPad to your computer using a Lightning or USB-C cable.
- Open Finder (macOS) or iTunes (Windows): Launch Finder on your Mac or iTunes on a Windows PC. Your device should appear in the sidebar.
- Enter Recovery Mode: This is crucial and the method differs slightly depending on your device model. Follow the instructions below for your specific device. Apple also provides more detailed information in this support article.
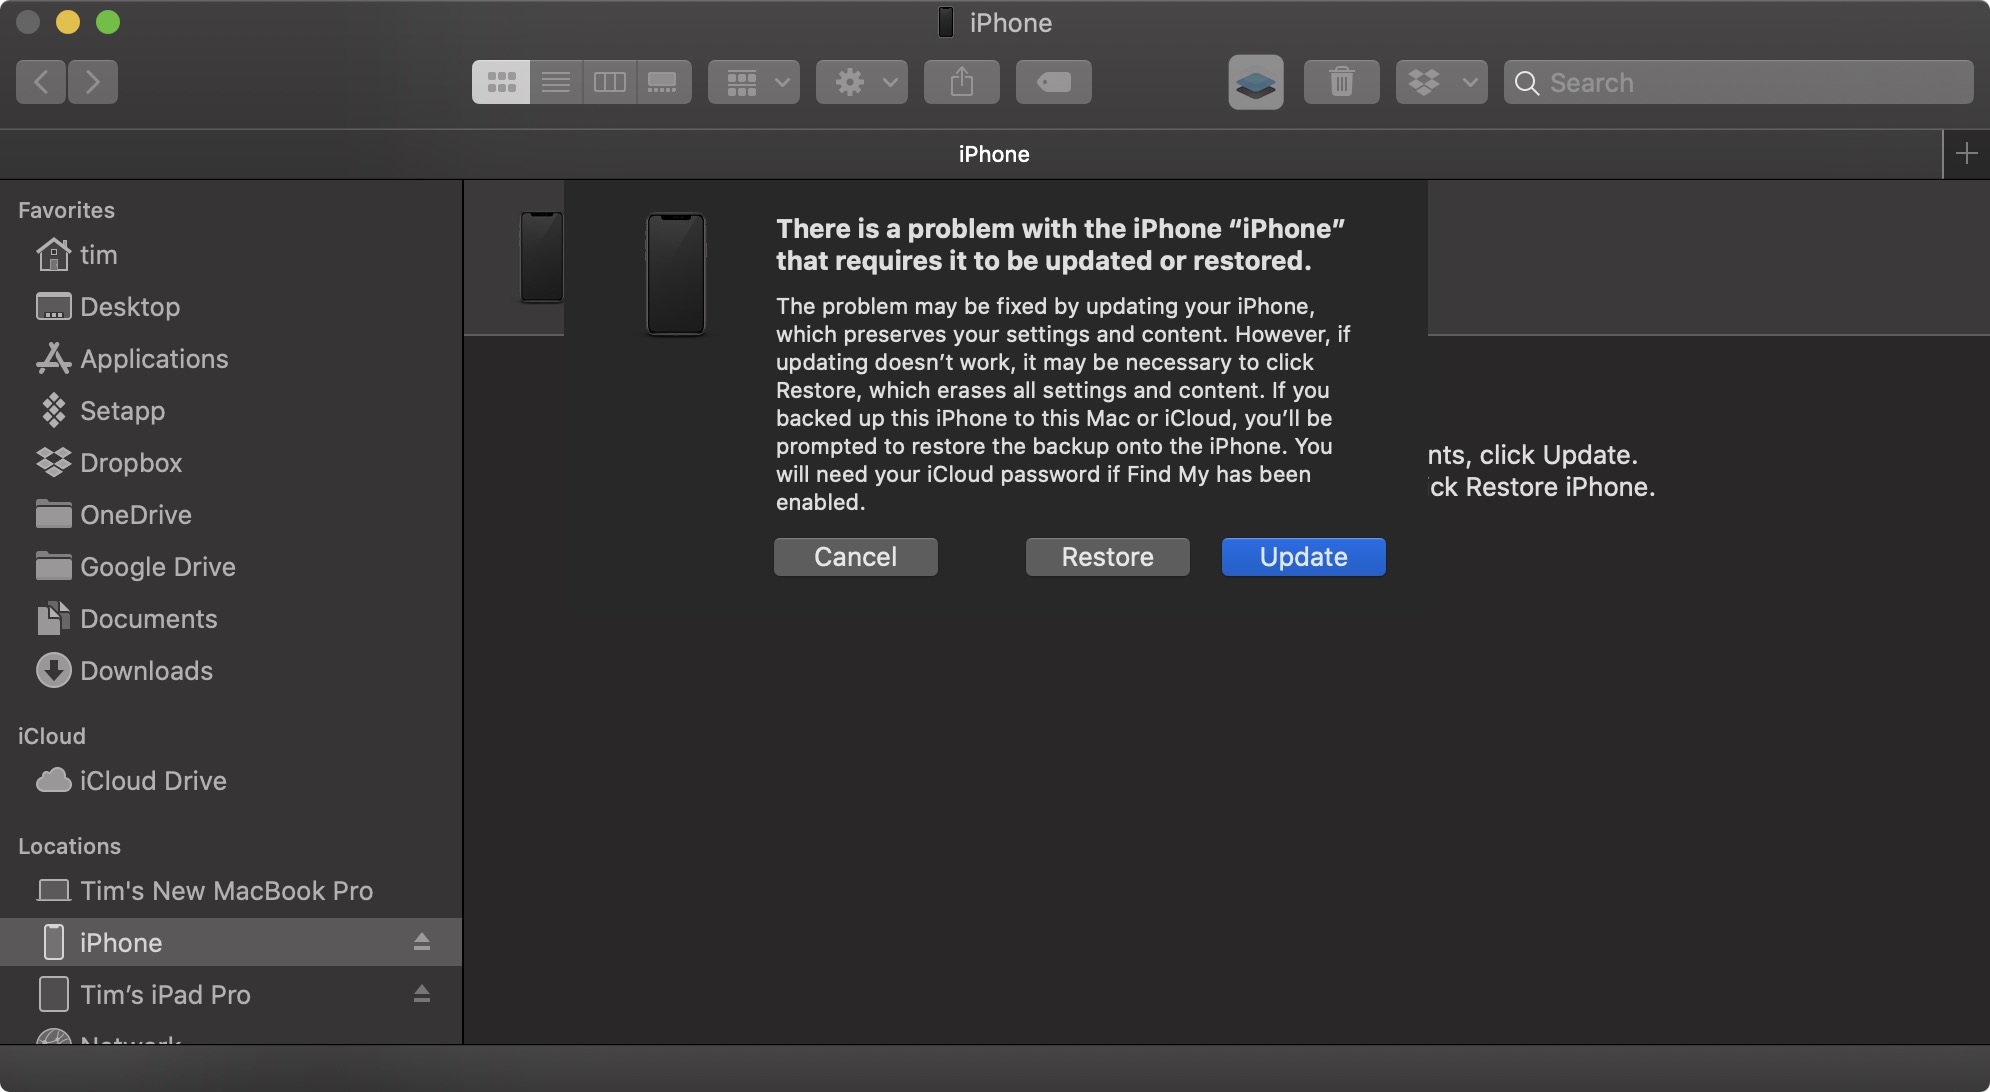
- Initiate the Restore: Once your device is in recovery mode, Finder (or iTunes) will detect it and prompt you to restore. Click the "Restore" button. This process will erase all data on your device and install iOS 18.
- Wait for Completion: The restore process can take some time, depending on your internet connection and the size of the iOS 18 software update. Do not interrupt the process.
- Restore from Backup (Optional): Once the restore is complete, you can restore your data from a previous iOS 18 backup created before you installed the beta. This backup can be located on your Mac, iCloud, or other designated location. Refer to your backup method for detailed instructions.
Entering Recovery Mode: Device-Specific Instructions
The method for entering recovery mode varies slightly depending on your device's model and whether it has a Home button or Face ID. Follow these instructions carefully:
- iPad models with Face ID: Press and quickly release the Volume Up button. Press and quickly release the Volume Down button. Press and hold the Top button (power button) until the device restarts. Continue holding the Top button until the recovery mode screen appears.
- iPhone XS or later (without Home button): Press and quickly release the Volume Up button. Press and quickly release the Volume Down button. Press and hold the Side button (power button) until the recovery mode screen appears.
- Older iPhones and iPads (with Home button): Simultaneously press and hold the Home button and the Top (or Side) button until the recovery mode screen appears.
If you encounter any difficulty during this process, refer to Apple's support documentation for more detailed instructions.
Troubleshooting and Important Notes
If you face any difficulties during the downgrade process, ensure your computer meets the minimum system requirements for iTunes or Finder to properly interact with your iOS device. Also, verify you have a stable internet connection, as the download and installation of iOS 18 require a significant amount of data transfer.
Remember, downgrading from a beta software version is not always reversible, particularly if you delete your older iOS 18 backups. Make sure you are fully comfortable with the possibility of data loss before proceeding with the downgrade.
This process should successfully downgrade your iPhone or iPad from the iOS 26 beta to the stable iOS 18 release. Always refer to Apple's official documentation for the most accurate and updated instructions.
Further Discussion
For further discussion or to share your experiences with downgrading from the iOS 26 beta, join the conversation in our forums: Discuss this article
This article, "How to Downgrade From the iOS 26 Beta to iOS 18" first appeared on MacRumors.com
from MacRumors
-via DynaSage
