
iOS 27: Access the New iPhone Recovery Screen
Mastering iPhone Recovery: Your Guide to iOS 27's New Self-Service Tools
We've all been there: your iPhone suddenly acts up. Maybe it's frozen, an update went sideways, or it's stuck in a confusing loop, refusing to start. In the past, these situations often meant a trip to a computer, wrestling with cables, and navigating complex software like iTunes or Finder. It could be a frustrating and time-consuming ordeal, especially when you're away from your desk or simply not technically inclined. Imagine facing a bricked iPhone while traveling or when your computer isn't readily available – a truly daunting prospect for many users.
For years, resolving serious iPhone software issues typically required connecting your device to a Mac or PC. While Apple has continuously worked to make these processes more user-friendly, the dependency on another machine remained a significant hurdle for true self-service repair and troubleshooting. This limitation often meant delays, inconvenience, and sometimes, a forced trip to an Apple Store or authorized service provider, even for issues that could potentially be resolved with a software fix.
However, Apple has been steadily evolving its approach to device recovery. With iOS 26, a significant step was taken towards empowering users. This version introduced a feature where a malfunctioning iPhone could automatically boot into Recovery Assistant. This was a welcome change, as it allowed the device to attempt self-correction without needing a computer. The catch? You could only access this helpful feature if your iPhone failed to start up on its own and automatically entered recovery mode. It was a reactive solution, excellent for severe, unexpected failures, but it lacked the proactive control that many users desired for intentional troubleshooting or maintenance.
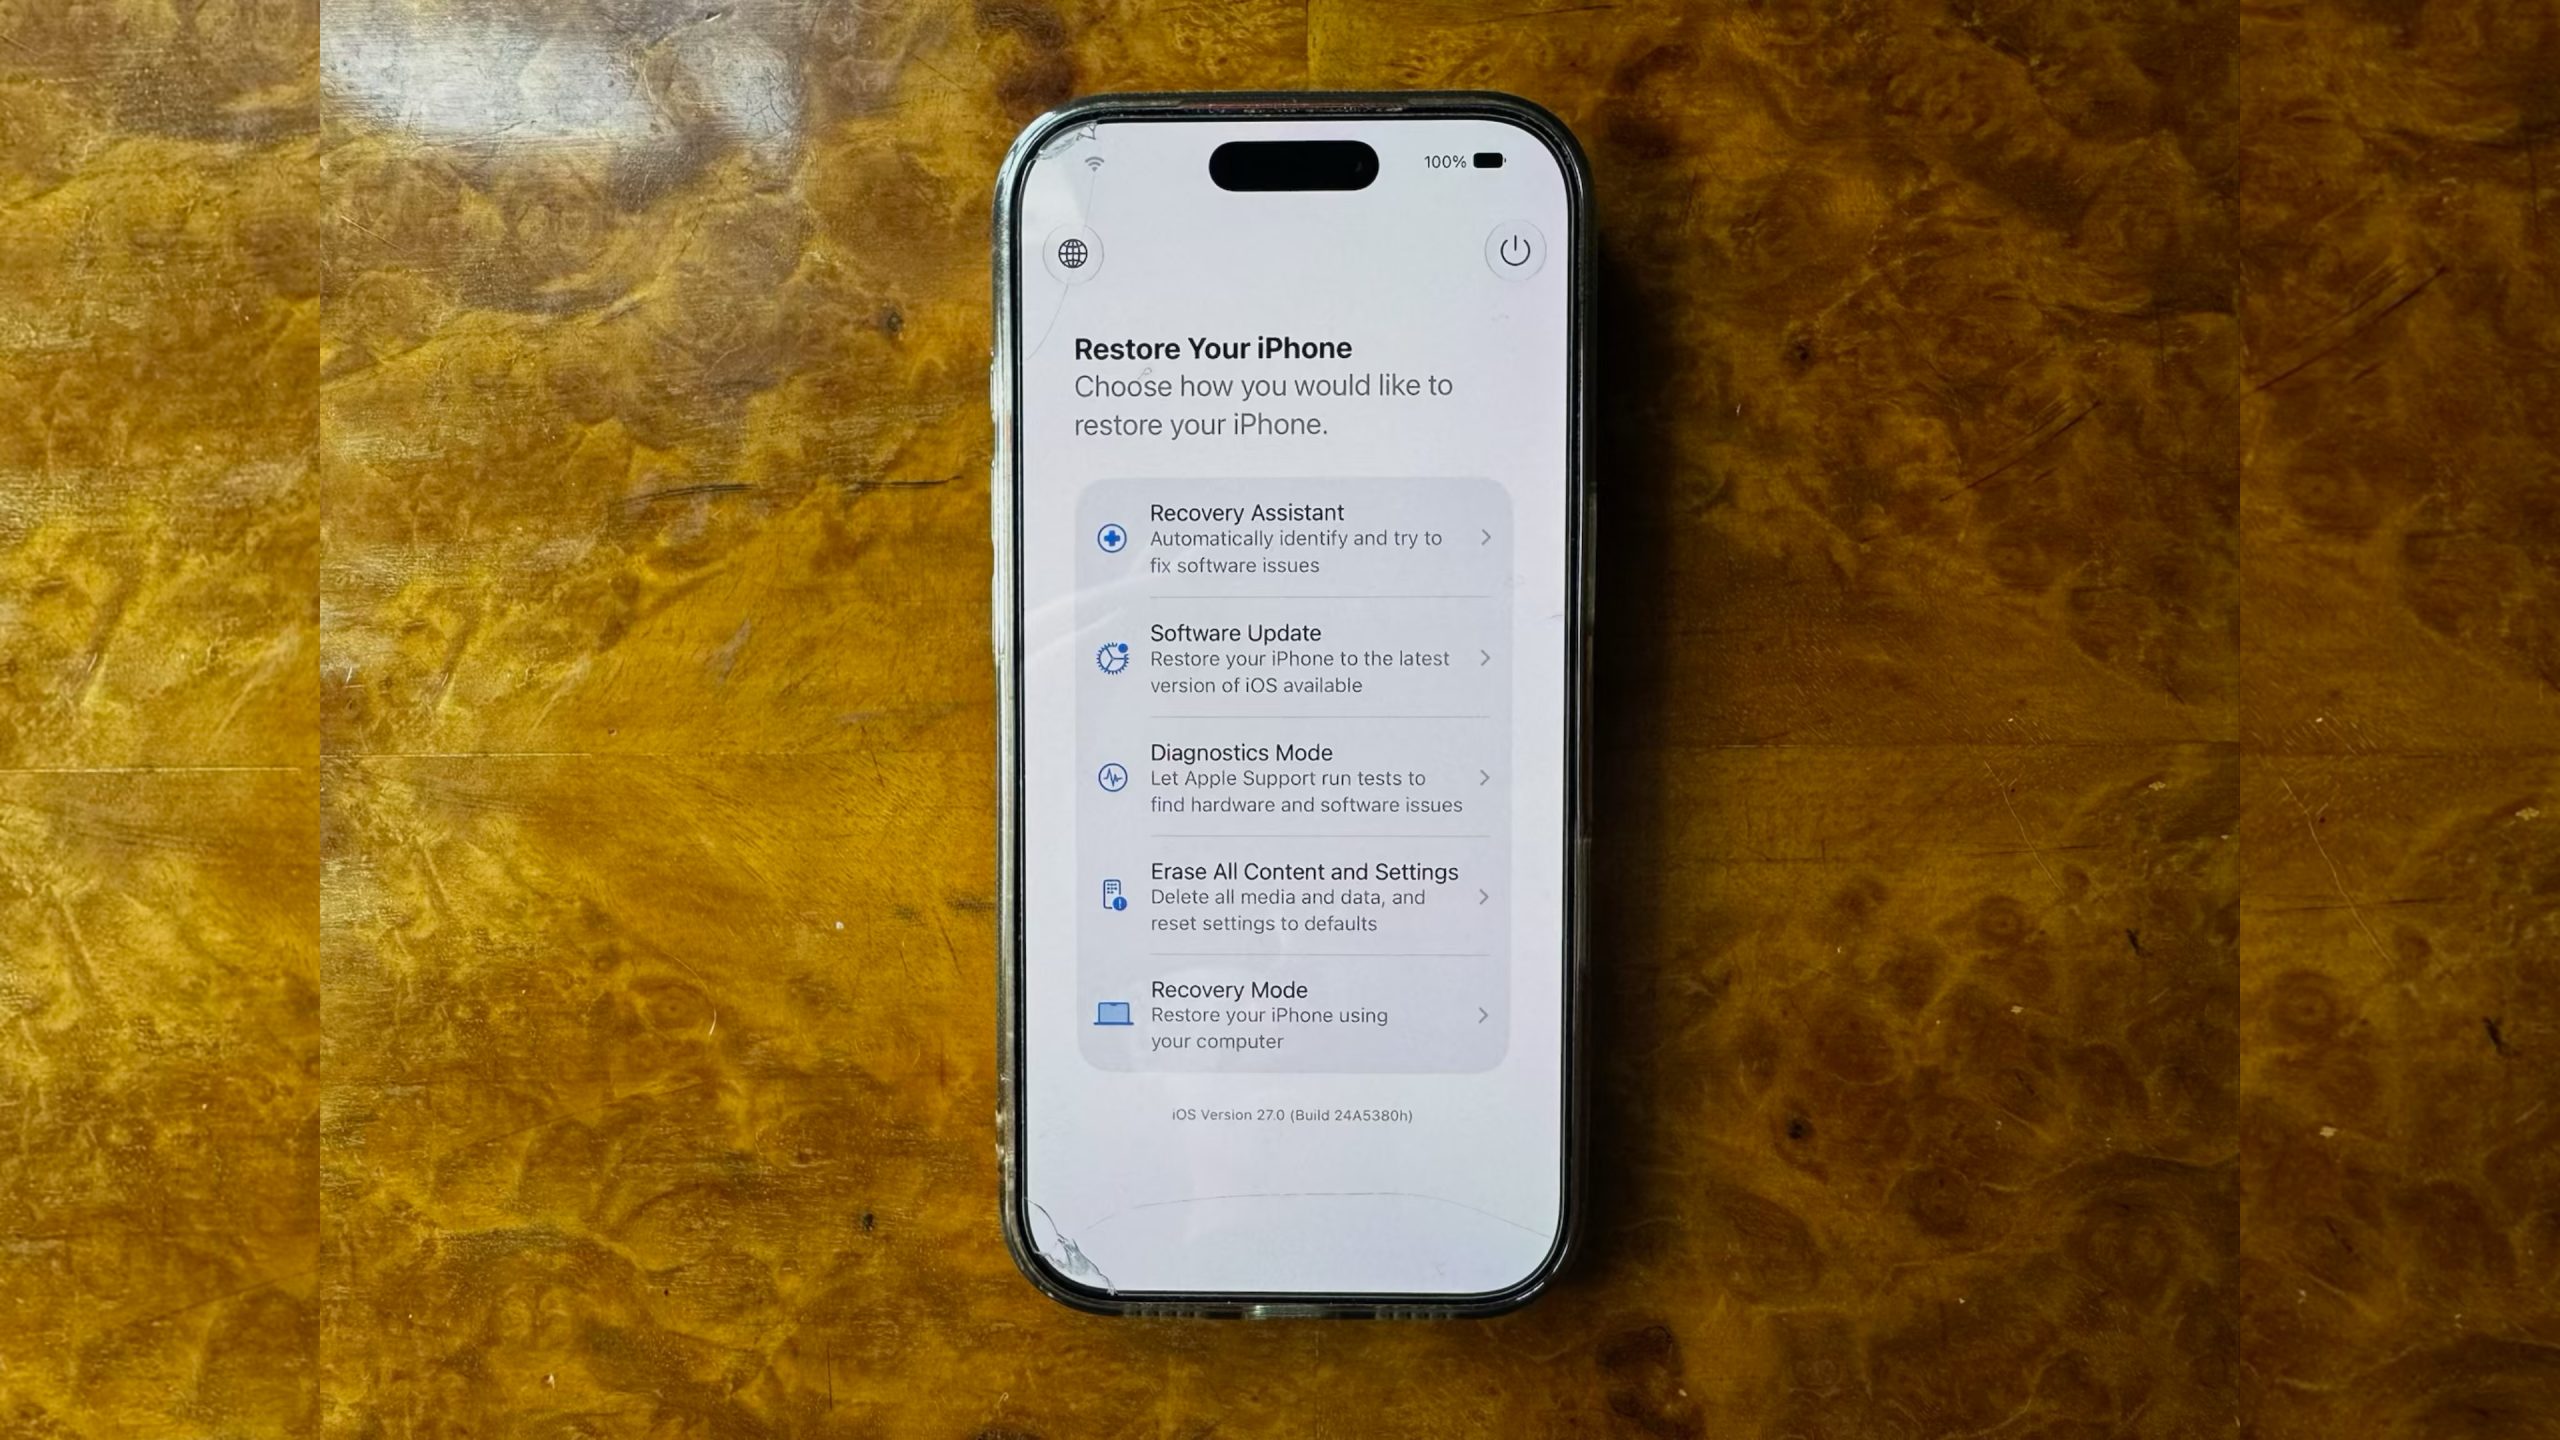
Fast forward to iOS 27, currently in its beta phase, and Apple has truly revolutionized the iPhone recovery experience. Building upon the foundation of iOS 26, the Cupertino giant has removed the previous limitation, granting users unprecedented manual control over their device's recovery process. Now, with iOS 27, you can manually boot your iPhone into a powerful, Mac-style recovery screen whenever you choose. This isn't just a minor update; it's a fundamental shift, transforming your iPhone into a more self-sufficient and resilient device, capable of addressing its own problems without external intervention.
This new, enhanced recovery mode is a game-changer for troubleshooting, updating, or even completely erasing your device. The most exciting aspect is that it largely eliminates the need to plug your iPhone into a computer. Imagine you're experiencing software glitches, your iPhone is stuck on the Apple logo, or you simply want to perform a clean reinstall of iOS before selling your device – all of this can now be handled directly on the iPhone itself. Moreover, this new system is designed with user convenience at its core. It can automatically connect to a known Wi-Fi network, ensuring that critical software updates can be downloaded without hassle. Plus, a small but incredibly thoughtful detail: it displays your battery percentage in the corner of the screen, so you're never left guessing if your device has enough power to complete the recovery process. This level of autonomy and user-friendliness truly sets a new standard for mobile device management.
Let's delve deeper into how this powerful new feature works and explore all the options available to you.
The Evolution of iPhone Recovery: From Cables to Cloud
Before diving into the specifics of iOS 27, it's worth taking a moment to appreciate how far iPhone recovery has come. In the early days, if your iPhone encountered a serious software issue, you almost certainly needed a computer running iTunes. This process often involved specific button combinations to enter Device Firmware Update (DFU) mode or standard recovery mode, followed by a full restore via iTunes, which would download and install a fresh copy of iOS. While effective, it was a technical process that could intimidate many users.
As technology progressed, Apple refined these methods. iTunes was eventually replaced by Finder on macOS, and the procedures became slightly more streamlined. However, the core dependency on a computer remained. This meant that if your computer was unavailable, broken, or you simply didn't own one, you were out of luck for serious troubleshooting. This posed a significant barrier for many, highlighting a gap in truly accessible device management.
The first significant leap towards device independence in recovery came with iOS 26's introduction of the automatic Recovery Assistant. This feature provided a safety net: if your iPhone detected a critical startup failure, it would automatically boot into a recovery environment, attempting to fix itself without user input or a computer. This was a crucial step, offering a passive form of self-healing. While incredibly useful for unexpected failures, it lacked the ability for a user to *choose* to enter this mode, limiting its utility for proactive maintenance or deliberate troubleshooting. iOS 27 addresses this directly, empowering users with the choice and control they've long desired, bridging the gap between automated fixes and full computer-based restores.
The Dawn of Self-Service: iOS 27's Enhanced Recovery Mode
The new recovery mode in iOS 27 represents a major paradigm shift. It transforms your iPhone into a truly self-sufficient device, capable of resolving many common and even some severe issues on its own. This self-service capability is not just a convenience; it's a significant empowerment for users worldwide, making device maintenance less intimidating and more accessible.
Key Innovations That Define This New Era:
- Unplugged Freedom: No Mac or PC Required: This is arguably the most impactful change. The ability to troubleshoot, update, or erase your iPhone without needing another device offers unparalleled freedom. Imagine you're traveling, and your iPhone starts misbehaving. Instead of scrambling to find a computer or postponing your fix until you return home, you can address the issue directly from your device. This is particularly beneficial for users who don't own a computer, rely solely on their iPhone for computing tasks, or simply prefer a more direct approach. It removes a significant barrier to entry for performing essential maintenance and recovery tasks.
- Seamless Connectivity: Automatic Wi-Fi Integration: A critical component of self-service recovery is the ability to connect to the internet. The new recovery mode intelligently connects to known Wi-Fi networks. This means that if you need to download a software update or verify your Apple ID, your iPhone can do so without any manual setup once you're in recovery mode. This streamlines the process, ensuring that necessary files can be fetched efficiently and securely, making the recovery experience as smooth as possible. No more fussing with Wi-Fi settings in a limited interface; it just works, similar to how your iPhone connects normally.
- User Confidence: Real-time Battery Percentage: It's a small detail, but a profoundly thoughtful one. When your iPhone is acting up, especially during a recovery process, you want to be sure it won't die mid-operation. Displaying the battery percentage directly on the recovery screen provides immediate reassurance. This allows you to confirm that your device has sufficient charge to complete any chosen action, preventing further complications or incomplete operations due to power loss. It's about giving you full visibility and control throughout the critical recovery stages.
- Intuitive Design: A Familiar Interface: Apple has designed this new recovery screen to feel familiar and approachable. It takes cues from the recovery environment found on Apple silicon Macs, creating a consistent user experience across Apple's device ecosystem. This familiarity reduces the learning curve and makes the process feel less daunting, even for those who might not consider themselves tech-savvy. The clear options and simple navigation ensure that users can confidently choose the right action for their device's situation.
These innovations collectively redefine what iPhone recovery means. It's no longer a complex, multi-device endeavor but an accessible, on-device solution designed for the modern user. This empowers you to take charge of your device's health, ensuring it remains operational and secure with minimal friction.
How to Boot Into Recovery Mode in iOS 27
Accessing this powerful new recovery mode is straightforward, designed to be intuitive and consistent with other Apple devices. If you're familiar with the equivalent mode on Apple silicon Macs, you'll find the process remarkably similar. The good news is that this same method also applies to iPads running iPadOS 27, ensuring a unified experience across your mobile Apple ecosystem.
Before you begin, ensure your iPhone has a decent charge, ideally above 20%, to prevent it from shutting down unexpectedly during the process. While the battery percentage is shown in recovery mode, it's always best to start with sufficient power. Find a quiet moment where you won't be interrupted, as precise timing of button presses is helpful.
- Turn off your iPhone completely.
To do this, typically you'll press and hold either the Side button and Volume Up button (for newer iPhones) or just the Side button (for older models) until the "Slide to Power Off" slider appears. Drag the slider to the right to power down your device. It’s crucial to wait for about a minute after the screen goes black to ensure the iPhone has fully shut down. This allows all internal processes to terminate cleanly, preventing any potential conflicts or issues during the subsequent boot sequence. Rushing this step can sometimes lead to the device booting normally instead of entering recovery mode.
- Press and hold the Side button.
Once your iPhone is fully off, locate the Side button (on the right-hand side of your iPhone). Press and hold it down. The Apple logo will appear on the screen, just as it normally does when your iPhone is starting up. This is a common point where many users might accidentally release the button, thinking the device is simply booting up. It's essential to resist this urge. Continue holding the Side button firmly. After a few more seconds, a message will appear on the screen saying, "Continue holding for recovery...". This is your visual cue that you're on the right track and the device is recognizing your intent to enter recovery mode.
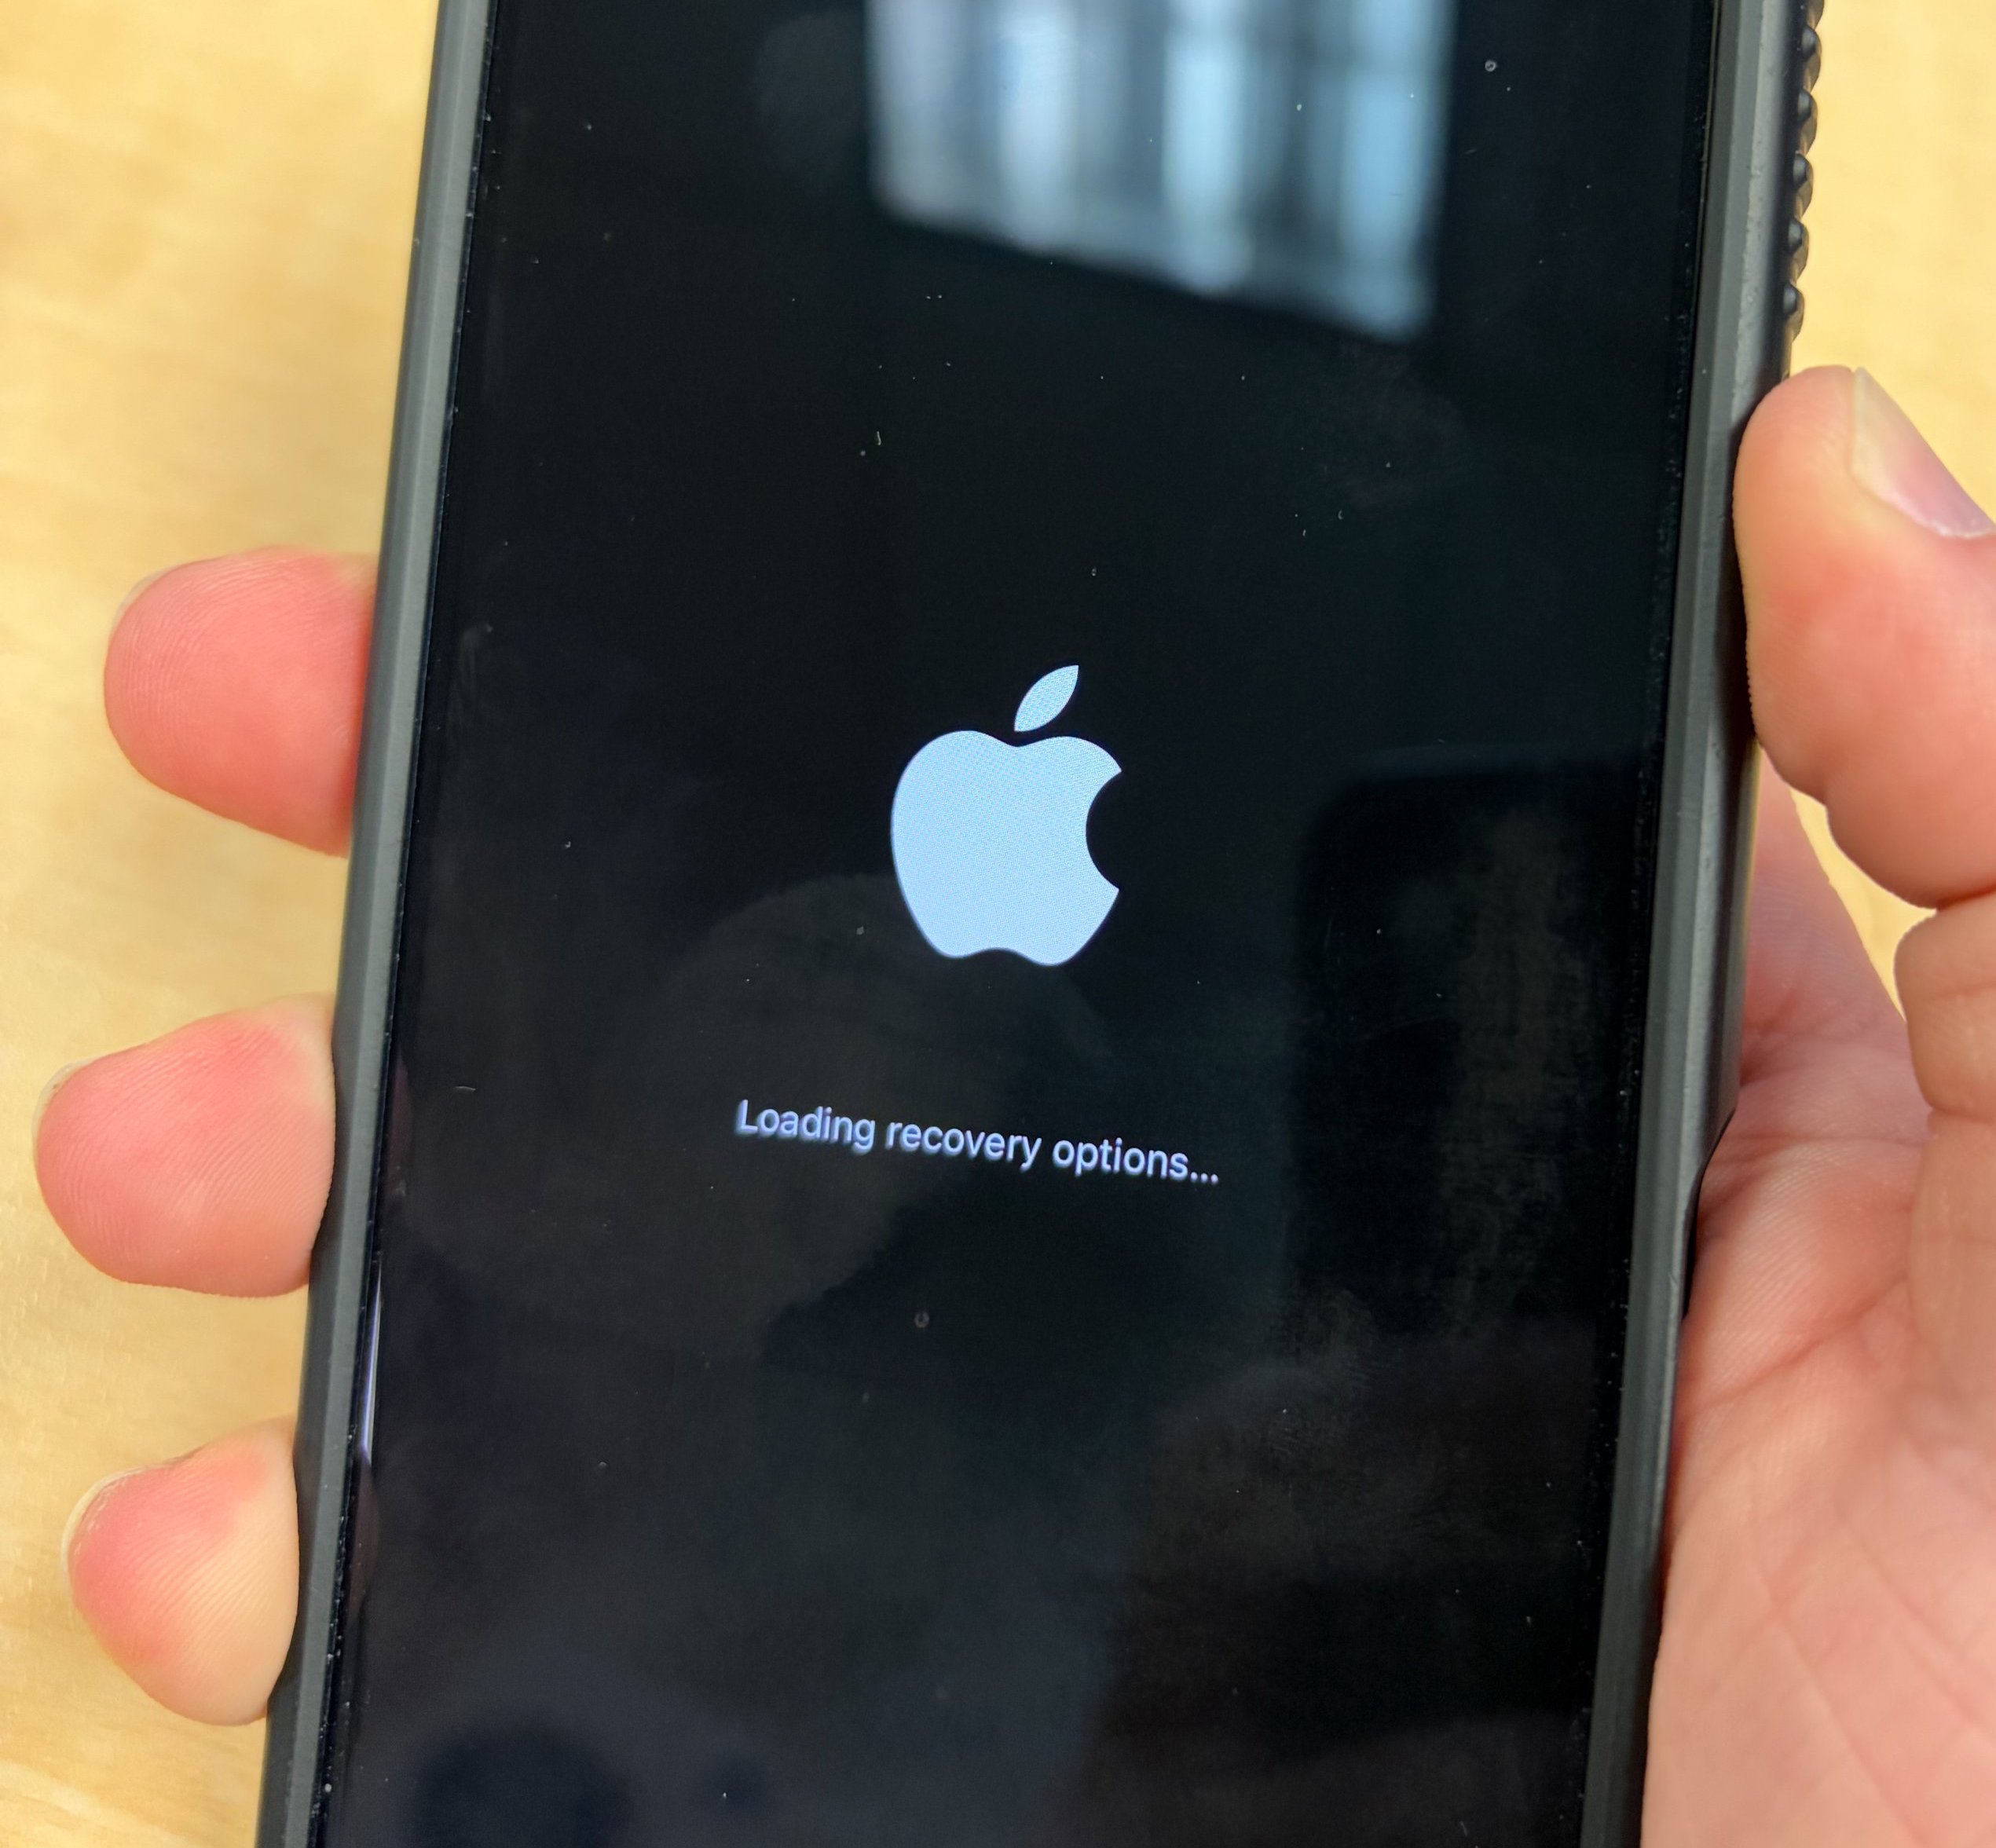
- Release the button when "Loading recovery options..." appears.
Keep holding the Side button until you see a new message on the screen: "Loading recovery options...". This is the precise moment to release the Side button. Releasing it too early might cause your iPhone to simply boot into iOS normally, and you'll have to start the process over. Releasing it too late could potentially confuse the system, though it's less likely to cause harm than releasing too early. Once "Loading recovery options..." flashes and then disappears, you've successfully initiated the new recovery mode.
Your iPhone will then transition from this loading screen and boot directly into the new, self-service recovery screen, rather than loading the standard iOS interface. You'll be presented with a set of powerful options, ready for you to diagnose, update, or reset your device without the need for any external tools.
Troubleshooting Access Issues: What If It Doesn't Work?
If you follow these steps and your iPhone still boots into normal iOS, don't worry. This is a common occurrence, often due to slightly mistiming the button presses. Here are a few tips if you're having trouble:
- Be Patient and Precise: Ensure you wait the full minute for the iPhone to shut down completely. When holding the Side button, be firm and consistent. Pay close attention to the on-screen prompts.
- Check Your Buttons: Ensure your Side button is physically working correctly. If it feels stuck or unresponsive, that could be the issue.
- Try Again: Sometimes it takes a couple of attempts to get the timing just right. Don't get discouraged!
- Charge Your Device: A very low battery might interfere with special boot modes. Ensure you have at least 20% charge.
What the Recovery Options Do: Your Self-Service Toolkit
Once you've successfully entered the new recovery screen, you'll be greeted by a concise menu offering a range of powerful options. Each option is designed to address specific types of issues, giving you precise control over your device's troubleshooting and maintenance. Let's break down what each of these tools can do for you.
1. Recovery Assistant: Your Automated Troubleshooter
- What it does: The Recovery Assistant is your first line of defense against common software problems. When selected, it automatically scans your iPhone for known software issues and attempts to fix them without requiring any further input from you. Think of it as a smart, automated repair agent for your device. It analyzes system files, processes, and configurations to identify and correct anomalies.
- When to use it: This option is ideal for minor glitches, unexpected app crashes, occasional restarts, or general system instability that doesn't prevent your iPhone from booting. If your device feels sluggish, has minor software bugs, or you're unsure what the exact problem is, the Recovery Assistant is an excellent starting point. It aims to resolve issues without causing data loss or requiring a full reinstallation of iOS.
- Benefits: It's incredibly user-friendly and requires minimal technical knowledge. It's a quick, non-invasive way to potentially resolve software hiccups before resorting to more drastic measures. For many common issues, this will be all you need to get your iPhone back to normal.
- Limitations: While powerful for minor issues, the Recovery Assistant might not be able to fix severe operating system corruption or hardware-related problems. In such cases, you might need to explore other options on the recovery screen.
2. Software Update: Refreshing Your iPhone's Core
- What it does: This option allows you to install the latest available version of iOS directly onto your device. Unlike updating through the Settings app, this method is specifically designed to work even if your iPhone is in a troubled state, such as being stuck in a boot loop (where it repeatedly shows the Apple logo and restarts). It downloads a fresh copy of the operating system and attempts to install it cleanly, often without erasing your personal data.
- When to use it: The Software Update feature is a lifesaver if your iPhone has become unresponsive after a failed iOS update, or if it's continuously restarting. It can also be used if you suspect a corrupt iOS installation is causing persistent performance problems, crashes, or security vulnerabilities. By reinstalling the operating system, you can often resolve deep-seated software issues that might be preventing your device from functioning correctly.
- Benefits: It's a non-destructive way to fix many critical software issues. For a device stuck in a boot loop, this can be the only way to get it operational again without wiping all your data. The ability to do this over Wi-Fi, without a computer, is a major advantage for quick, on-the-go repairs.
- Important Note: While this process usually preserves your data, it's always recommended to have a recent backup of your iPhone (via iCloud or computer) before attempting any significant software changes, just in case. A stable and fast Wi-Fi connection is also crucial for downloading the update files.
3. Diagnostics Mode: Peering Under the Hood
- What it does: The Diagnostics Mode is a powerful tool for deep analysis. When activated, it runs a comprehensive set of diagnostics to check for both hardware and software issues within your iPhone. This mode is designed to thoroughly examine various components, including the battery, display, sensors, storage, and key software processes, looking for anomalies or failures. After completing its scan, it can often provide a report or recommend specific repairs if a problem is detected.
- When to use it: This option is invaluable if you suspect a hardware problem, such as unexplained battery drain, issues with the camera or speakers, erratic screen behavior, or if your iPhone is generally underperforming without clear software symptoms. It's also useful if you're experiencing persistent software problems that the Recovery Assistant or a simple Software Update couldn't fix, as it might uncover underlying system corruption.
- Benefits: Diagnostics Mode helps you pinpoint the root cause of a problem, saving you time and guesswork. It can provide objective data that can be extremely helpful when communicating with Apple Support or an authorized repair center. Knowing whether an issue is hardware or software related allows for a more targeted and efficient repair process, potentially preventing unnecessary steps or expenses.
- How it differs: Unlike the other options that aim to fix or erase, Diagnostics Mode focuses purely on identifying and reporting problems, offering insights into the health of your device.
4. Erase All Content and Settings: The Fresh Start
- What it does: This option performs a complete factory reset of your iPhone. It securely wipes all your personal data, installed apps, settings, and media, effectively returning your device to the state it was in when you first took it out of the box. This is identical in function to the "Erase All Content and Settings" option found within the Settings app under General > Transfer or Reset iPhone.
- When to use it: This is a powerful, irreversible action that should be used judiciously. It's primarily intended for situations where you are selling, trading in, or giving away your iPhone, ensuring that none of your personal information remains on the device. It's also a last resort for severe software corruption that cannot be fixed by the Recovery Assistant or Software Update. If your iPhone is constantly crashing, exhibiting deeply embedded bugs, or is otherwise unusable due to software issues, a complete wipe and fresh iOS installation can often resolve these intractable problems.
- Crucial Warning: Data Loss! This action will permanently delete all data on your iPhone. **It is absolutely essential to have a complete and recent backup of your device before choosing this option.** If you proceed without a backup, all your photos, videos, messages, contacts, and app data will be lost forever. Always ensure your latest backup is stored securely in iCloud or on a computer.
- Benefits: Guarantees privacy when parting with your device. Can resolve the most stubborn software issues by providing a completely clean slate.
5. Recovery Mode (Traditional): For Computer-Assisted Rescues
- What it does: This option puts your iPhone into the traditional recovery mode, making it ready to be recognized and restored by a Mac (using Finder) or a PC (using iTunes). While iOS 27's new self-service features aim to reduce the need for a computer, there are still scenarios where a computer-based restore might be necessary or preferred, especially for advanced troubleshooting or if the self-service options fail.
- When to use it: You would select this option if the on-device Recovery Assistant, Software Update, or Diagnostics Mode couldn't resolve your issue, and you specifically want to perform a restore using a computer. It's also useful for specific troubleshooting steps recommended by Apple Support that require a computer connection. This option saves you the hassle of remembering and executing the complex button-press sequences typically required to manually put an iPhone into traditional recovery mode; you can now access it directly from the new recovery screen.
- Benefits: Provides a streamlined path to computer-based restores when needed, without the usual manual entry sequence. This ensures that even the most advanced or specific recovery scenarios remain accessible.
6. Nearby Device Recovery (Hidden Option): Peer-to-Peer Healing
- What it does: This is an incredibly innovative and convenient feature for specific situations. The Nearby Device Recovery option allows you to restore your problematic iPhone by using another nearby Apple device, such as another iPhone or an iPad. Instead of needing a computer or even a Wi-Fi connection for the problematic device itself, it leverages the capabilities of a healthy, authenticated Apple device nearby.
- How to access it: While on the main recovery screen, this option is not immediately visible. You need to perform an additional step: press and hold the Side button again. A small popup menu will then appear on the screen, revealing the "Nearby Device Recovery" option.
- When to use it: This feature is particularly useful when you don't have access to a computer, and your problematic iPhone cannot connect to Wi-Fi for an over-the-air update (perhaps due to a deeper software issue). If you have another Apple device belonging to you or a trusted friend/family member close by, this method offers a powerful alternative. It's perfect for emergencies or situations where traditional recovery methods are unavailable.
- Context: This builds upon an existing recovery feature that debuted on iPhone 16 models, which allowed a new iPhone to quickly set up using an old iPhone nearby. Apple has now extended this peer-to-peer capability to actual device recovery, highlighting a growing trend towards interconnected device functionality and enhanced user convenience within the Apple ecosystem. It makes troubleshooting more flexible and less dependent on isolated resources.
Understanding each of these options empowers you to make an informed decision about the best course of action for your iPhone's specific issue. With iOS 27, you now have a comprehensive, on-device toolkit at your disposal, ready to tackle a wide range of problems.
Best Practices and Important Considerations for Recovery
While the new iOS 27 recovery mode makes troubleshooting easier than ever, adhering to a few best practices can significantly improve your chances of a successful outcome and protect your valuable data.
1. Backup, Backup, Backup!
This cannot be stressed enough. Before attempting any significant recovery or troubleshooting steps, especially those involving software updates or erasing content, ensure you have a recent and complete backup of your iPhone. This can be done via iCloud or by connecting to your computer (Mac with Finder, PC with iTunes). A backup is your safety net; it allows you to restore your iPhone to its previous state, preserving all your photos, videos, contacts, messages, apps, and settings, even if something goes wrong during the recovery process. Don't learn this lesson the hard way!
2. Charge Your iPhone
Always ensure your iPhone has sufficient battery life before starting any recovery procedure. Ideally, your device should be charged above 50%, or even connected to a power source if possible. Although the new recovery screen conveniently displays the battery percentage, you don't want your device to die in the middle of a software update or restore operation, as this could lead to more severe software corruption and a potentially unrecoverable state.
3. Ensure a Stable Wi-Fi Connection (If Needed)
If you plan to use the "Software Update" option or if your chosen recovery step requires internet access for verification or download, make sure your iPhone is connected to a stable and reliable Wi-Fi network. Unstable connections can lead to corrupted downloads, failed updates, and wasted time. The new recovery mode's ability to automatically connect to known Wi-Fi networks is a huge plus, but ensure the network itself is robust.
4. Patience is a Virtue
Recovery processes, especially software updates or full restores, can take time. Downloading large iOS files, verifying the update, and installing it can involve several steps and reboots. Avoid interrupting the process once it has started. Let your iPhone do its work. Prematurely restarting or disconnecting the device can lead to incomplete installations and further complications.
5. When to Seek Professional Help
While the new recovery tools are powerful, they might not fix every issue. If you've tried all the relevant options on the recovery screen and your iPhone still isn't functioning correctly, or if you suspect a serious hardware defect, it's time to contact Apple Support or visit an authorized service provider. They have specialized tools and expertise to diagnose and repair issues that are beyond the scope of user-level troubleshooting. Don't hesitate to reach out if you're stuck.
Exiting the Recovery Screen Gracefully
Once you've completed your troubleshooting, update, or erase operation, or if you simply entered the recovery mode by mistake and wish to exit, the process is straightforward. A clean exit ensures your iPhone reboots normally and doesn't leave any pending operations. There are a couple of ways to leave the recovery screen:
- On-Screen Button: The most direct method is to tap the power button icon, usually located in the top-right corner of the recovery screen. After tapping, you will likely be prompted to confirm that you want to restart your device. Confirming this will initiate a normal reboot sequence for your iPhone.
- Physical Side Button: Alternatively, you can press and hold the physical Side button (the same button you used to enter recovery mode). Continue holding it for a few seconds until a menu appears on the screen, offering options like "Restart" or "Shut Down." Select "Restart" to exit recovery mode and boot your iPhone normally into iOS. If you choose "Shut Down," your iPhone will power off, and you'll need to press the Side button again to turn it back on.
After exiting, your iPhone will typically boot up as usual. If you performed an "Erase All Content and Settings" operation, you will be taken to the initial setup screen, as if it were a brand new device. If you performed a "Software Update," you might see a progress bar as the system finalizes, followed by a normal boot into the updated iOS version.
Who Benefits Most from This New Feature?
The introduction of iOS 27's enhanced recovery mode isn't just a technical upgrade; it's a significant improvement for a diverse range of iPhone users. Several groups stand to benefit immensely from this newfound self-service capability:
- Beta Testers: For those on the bleeding edge, experimenting with public or developer betas of iOS, things can often go wrong. Betas are inherently unstable, and a bad update or unexpected bug can sometimes render an iPhone unusable. This new recovery mode provides a crucial lifeline for beta testers, allowing them to fix their devices without needing to constantly revert to a computer-based restore.
- Users Experiencing Common Software Glitches: From persistent app crashes to unexplained freezing or slow performance, minor software bugs are a fact of life for any complex operating system. The Recovery Assistant and Software Update options provide quick, on-device solutions for these everyday nuisances, often preventing the need for a full device reset.
- Travelers and Those Without Immediate Computer Access: Imagine your iPhone acts up during a trip, or you simply don't own a computer. The ability to troubleshoot and update your device using just Wi-Fi or another nearby Apple device is incredibly liberating. It eliminates the geographical and logistical barriers that previously complicated iPhone recovery.
- Individuals Selling or Gifting Old iPhones: Properly wiping a device before passing it on is paramount for privacy. The "Erase All Content and Settings" option in recovery mode provides a reliable and accessible way to factory reset an iPhone, even if the operating system itself is too unstable to reach the settings menu.
- Anyone Seeking a Simpler, Less Intimidating Solution: Many users find the idea of connecting their iPhone to a computer for troubleshooting to be intimidating. The new on-device recovery mode demystifies the process, offering a graphical, intuitive interface that makes resolving complex issues feel more approachable and less like a technical chore.
In essence, this feature makes iPhone ownership more resilient and independent. It puts powerful diagnostic and repair tools directly into the hands of users, reducing reliance on external hardware and technical support for many common problems.
The Future of iPhone Self-Service: A Glimpse Ahead
The introduction of this advanced, self-service recovery mode in iOS 27 is more than just a new feature; it's a clear indicator of Apple's broader strategic direction. This move aligns perfectly with the company's increasing emphasis on user empowerment and device longevity. By giving users more control over their device's health, Apple is fostering a culture of self-reliance, potentially reducing the burden on their support infrastructure and extending the useful life of iPhones.
This initiative complements other recent efforts, such as Apple's Self Service Repair program, which provides manuals, tools, and genuine parts for users to perform their own repairs. Together, these steps suggest a future where iPhone owners have unprecedented access to maintain, diagnose, and repair their devices, rather than being solely dependent on official service channels. This enhanced independence is a significant boon in an era where consumers are increasingly demanding sustainable options and greater control over their technology.
The convenience factor for the modern user cannot be overstated. In a world where smartphones are indispensable, the ability to quickly and effectively address critical issues without external assistance ensures continuous connectivity and productivity. This evolution of iPhone recovery reflects Apple's commitment to delivering not just powerful technology, but also a seamless and self-sufficient user experience, making your iPhone more robust and reliable than ever before.
Conclusion: Empowering You with On-Device Control
The new recovery screen in iOS 27 marks a significant leap forward in how iPhone users can troubleshoot and maintain their devices. Gone are the days when a serious software issue automatically meant finding a computer and navigating complex software. With the ability to manually boot into a comprehensive, Mac-style recovery environment directly on your iPhone, you gain unprecedented control and autonomy.
Whether you're facing minor software glitches that the Recovery Assistant can swiftly resolve, a critical boot loop that the Software Update feature can fix over Wi-Fi, or you need to completely erase your device for a fresh start, iOS 27 equips you with a powerful, intuitive toolkit. Even specialized needs like hardware diagnostics or peer-to-peer recovery via a nearby device are now at your fingertips, making iPhone ownership more resilient and less dependent on external resources.
You shouldn't need the new recovery screen often, but knowing these powerful steps and options is invaluable. It's a critical skill to have in your arsenal, especially in situations where a beta goes wrong, a failed update bricks your iPhone, or you simply need to perform a quick diagnostic check. This feature reduces stress and downtime, giving you the confidence to tackle common device issues head-on.
iOS 27 is currently in public beta, so if you're eager to experience these new recovery capabilities and other exciting features, you can download and try it out now. Otherwise, look forward to its official release in the fall, when this transformative self-service power becomes available to all iPhone users.
This article, "iOS 27: Access the New iPhone Recovery Screen" first appeared on MacRumors.com
Discuss this article in our forums
from MacRumors
-via DynaSage
