
Create a Custom Pass in the Wallet App on iPhone
With iOS 27, learning how to create a custom pass in the Wallet app on iPhone allows you to easily convert physical event tickets, gift cards, and loyalty cards into convenient digital passes. This step-by-step guide covers everything you need to know about scanning physical cards with Visual Intelligence, customizing pass templates, and managing your digital wallet efficiently.
Carrying around a bulky physical wallet filled with paper tickets, plastic membership cards, and paper store coupons can quickly become inconvenient. While many event vendors and retail stores offer native digital passes, many physical tickets and cards still lack official Apple Wallet support. In iOS 27, Apple addresses this issue by giving iPhone users the ability to turn almost any physical card or ticket into a personalized digital pass.
Whether you hold a paper stub for a local concert, a plastic gym membership card, or a retail gift card, you no longer have to worry about leaving it behind or losing it. The updated Wallet app provides powerful tools to scan, format, and organize your cards directly on your device. In this comprehensive tutorial, we will explain how to create a custom pass in the Wallet app on iPhone using both automatic scanning and manual setup methods.
Why You Should Create a Custom Pass in Apple Wallet
Digitizing your physical cards brings unmatched convenience to your daily routine. By storing your event tickets, membership cards, and loyalty passes on your iPhone, you ensure that essential information is always accessible at your fingertips. You will no longer need to dig through pockets or purse compartments just to find a store loyalty code or a concert entry pass.
Another major advantage of creating custom passes is organization. Instead of holding onto worn paper passes or cluttering your pocket with plastic cards, everything is organized neatly inside the single built-in Wallet app. Furthermore, digital passes reduce the risk of physically losing or damaging valuable tickets before an event occurs.
In addition, custom passes support standard scanning formats like barcodes and QR codes. When you reach the venue gate or retail checkout, the scanner can quickly read your iPhone screen just like a physical card. This makes transitioning from physical cards to a digital ecosystem smooth and effortless.
Understanding iOS 27 Visual Intelligence for Wallet Passes
One of the most impressive additions in iOS 27 is the integration of Visual Intelligence within the Wallet app. Visual Intelligence uses advanced camera scanning and optical recognition to analyze physical cards in real time. When you point your iPhone camera at a physical pass, Visual Intelligence automatically detects the relevant information printed on it.
Once scanned, the system intelligently pairs the captured information with a suitable pass template. It identifies card names, dates, locations, ticket types, and contact details, placing them into structured data fields automatically. This automated recognition saves you time by reducing the need for manual text entry.
Although Visual Intelligence does a remarkable job mapping out details, you maintain full control over the final product. After the scan is completed, you can review every automatically populated field, adjust text labels, add extra notes, or change the visual appearance before saving. This balance of automated camera intelligence and custom user control ensures your digital passes look clear and accurate.
How to Create a Custom Pass in the Wallet App on iPhone Using Visual Intelligence
Creating a digital pass using the built-in Visual Intelligence scanning feature takes only a few quick steps. Follow these instructions to scan your physical paper or plastic pass directly into your iPhone Wallet app:
- Open the Wallet app on your iPhone and tap the + button located at the top of the screen.
- Choose the Create a Pass option from the menu list.
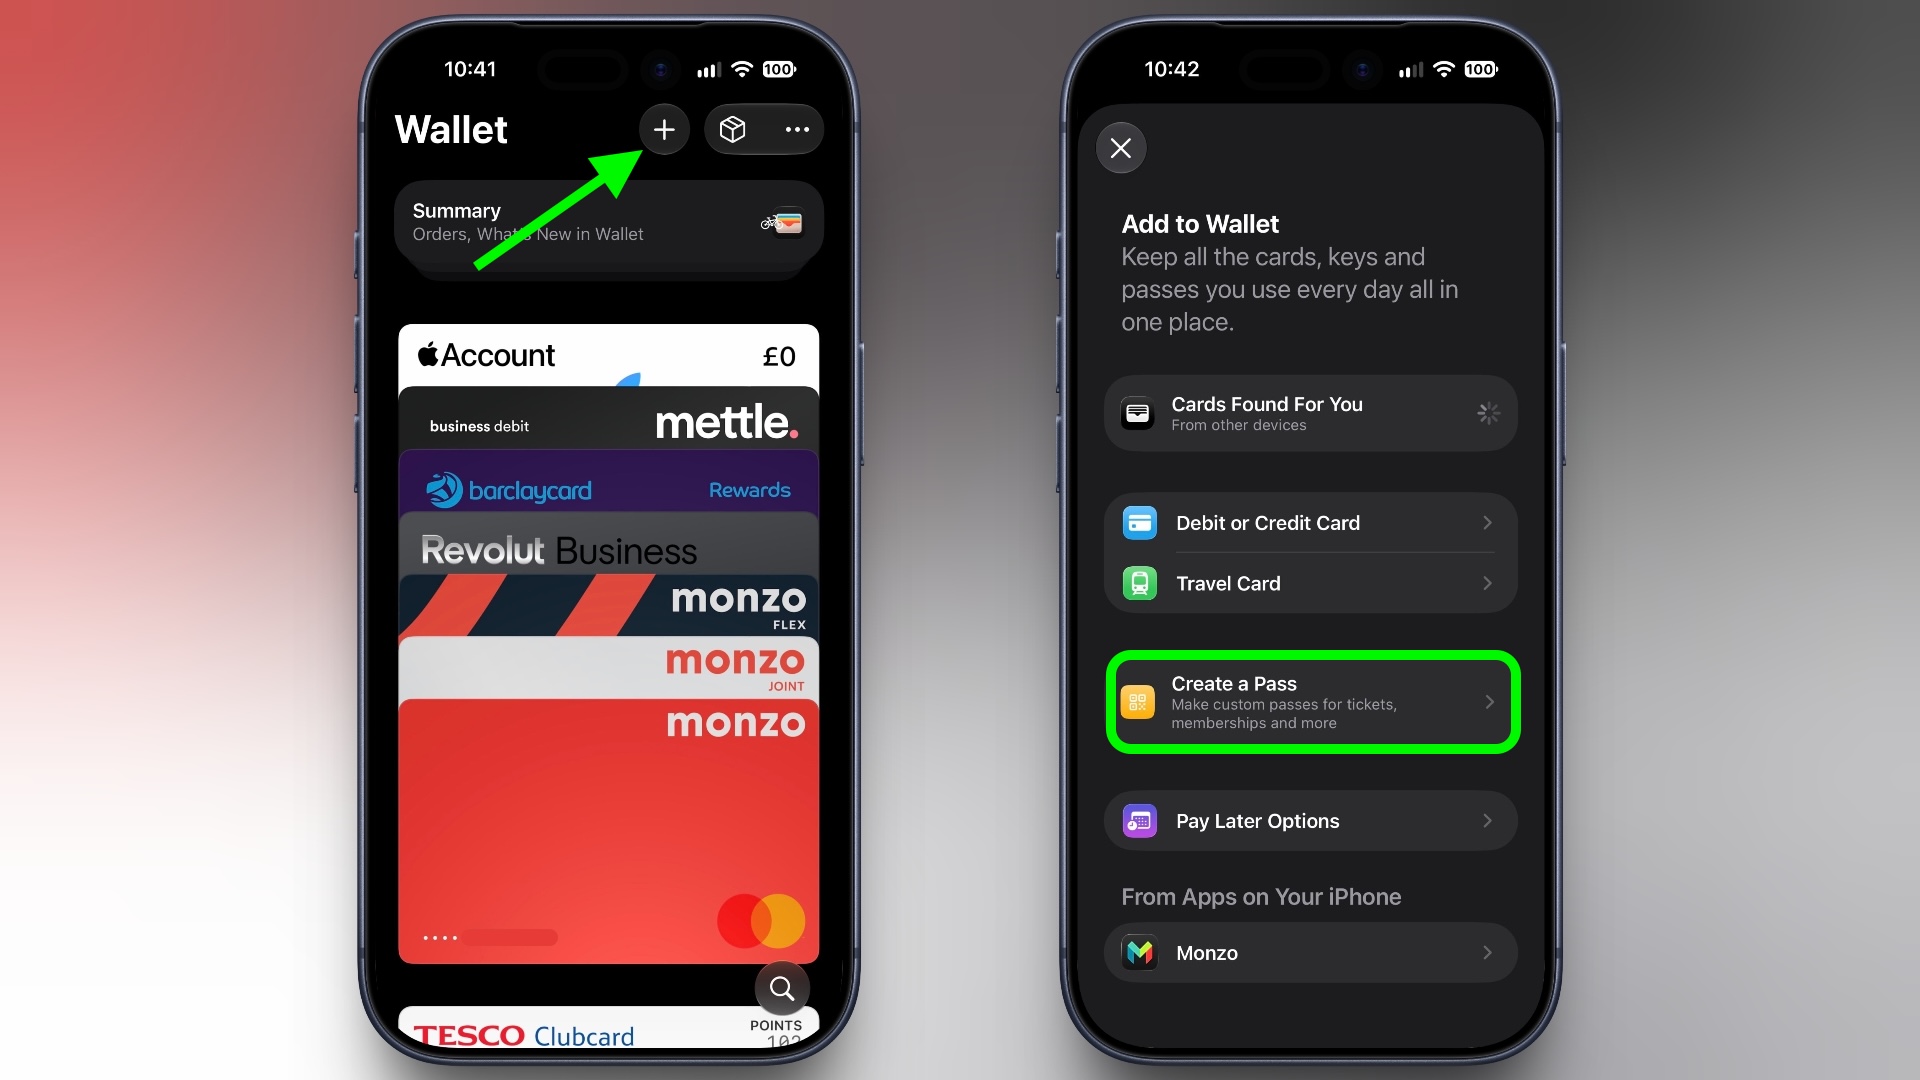
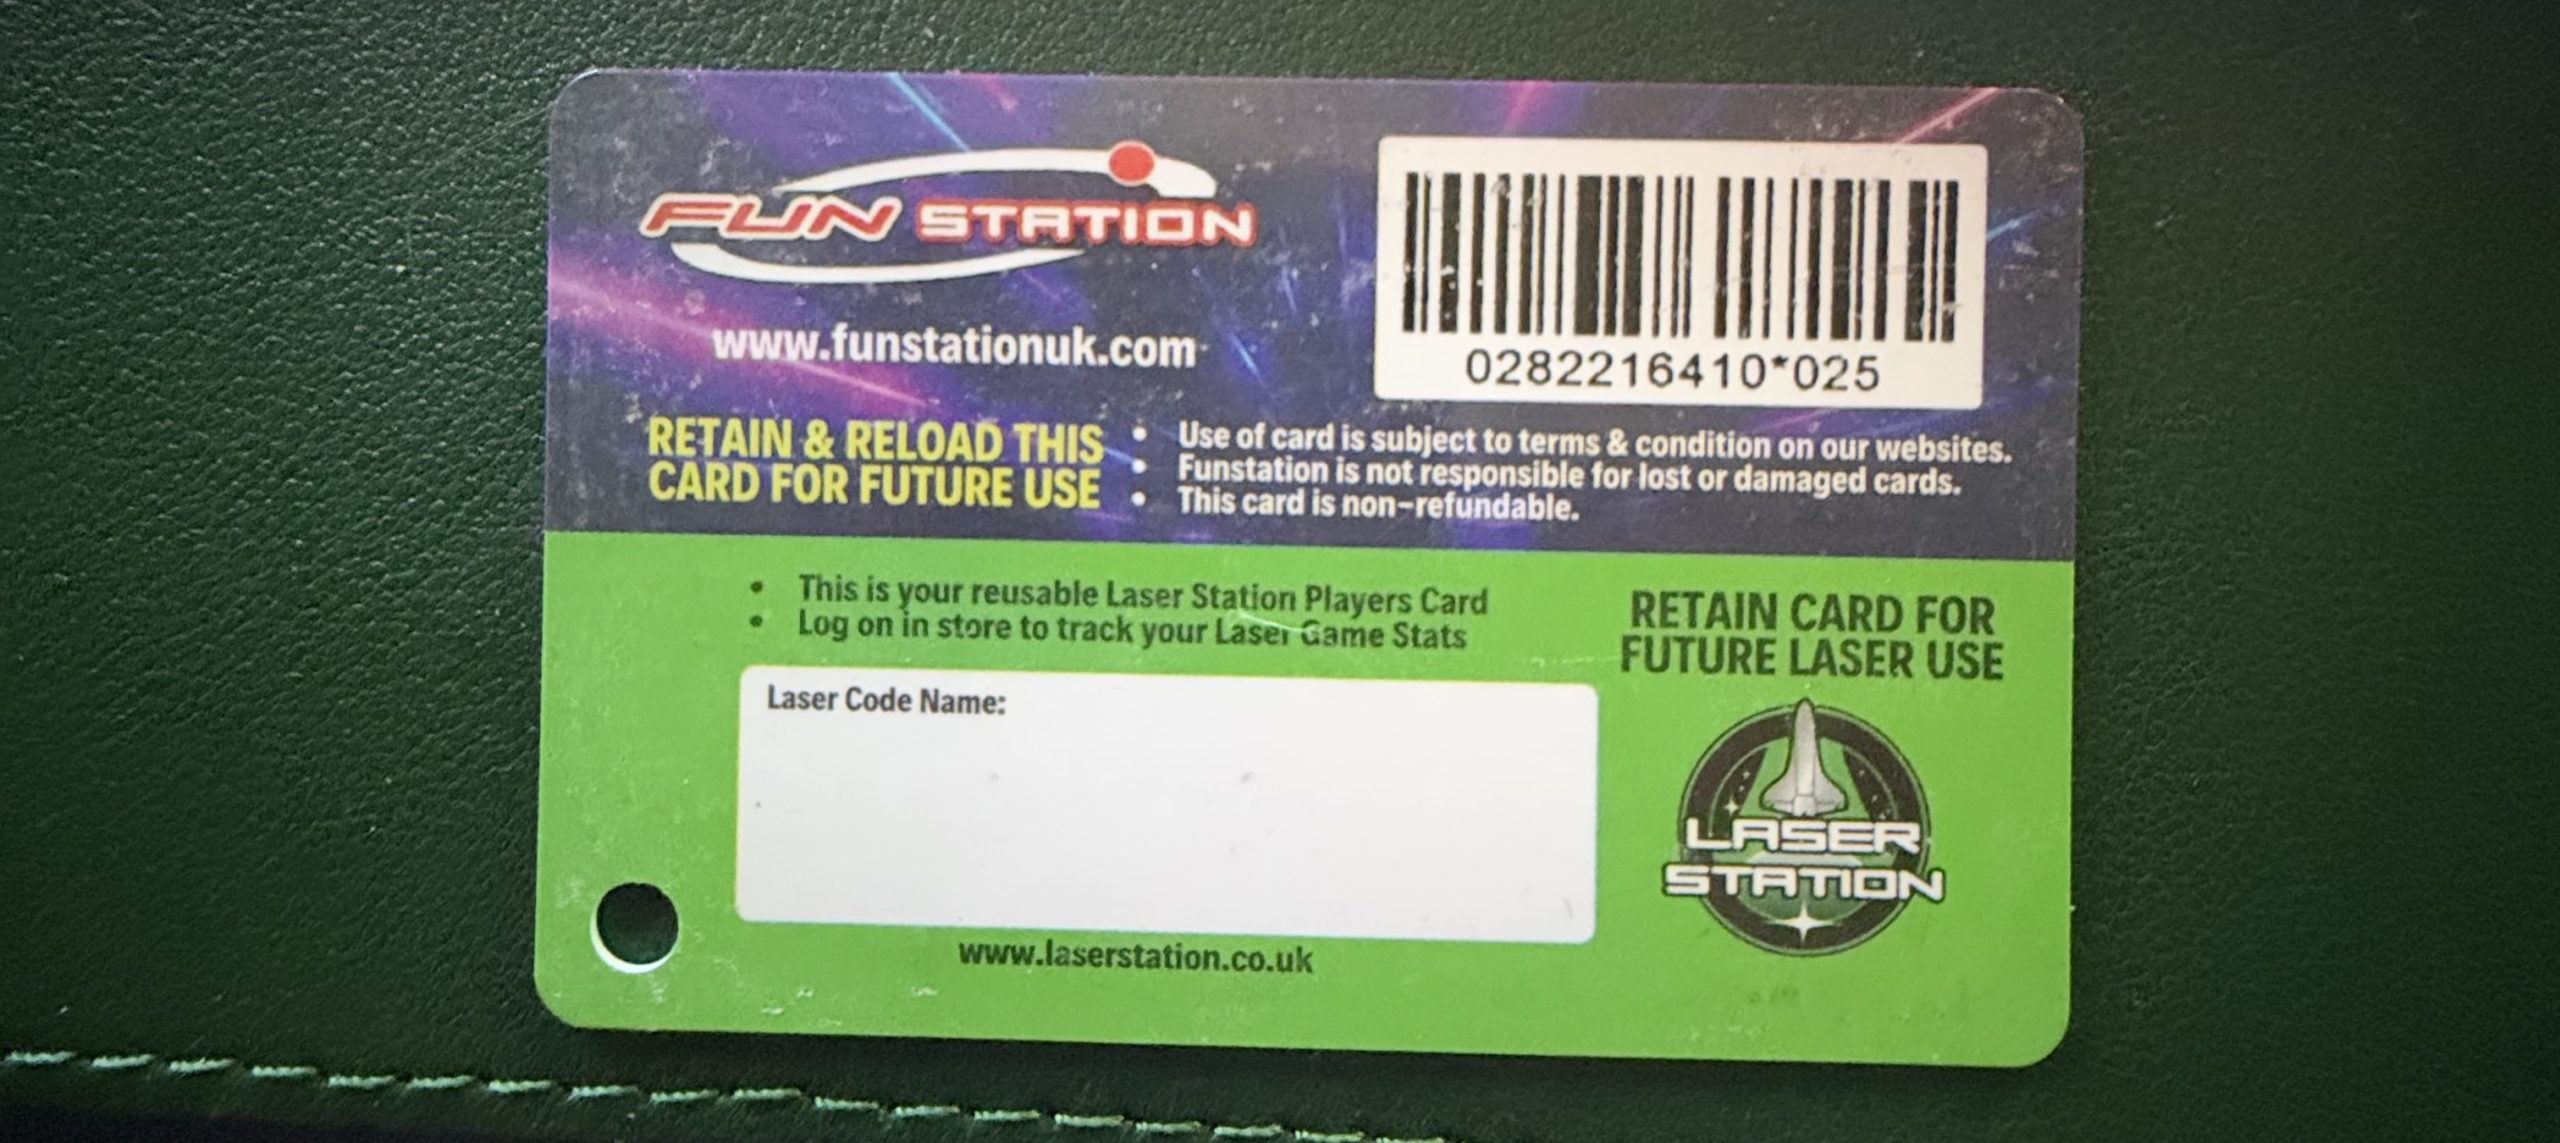
- To let Visual Intelligence scan the pass, tap Continue, then capture a clear photo of your physical pass on the next screen.
- After Visual Intelligence processes the image and matches the pass to an appropriate template, tap Edit Pass.
- Use the palette icon located in the bottom-left corner to change the visual appearance of the pass. You can change the background color or choose a custom background photo directly from your Photos library. Tap the icon in the bottom-right corner to add or remove specific data fields.
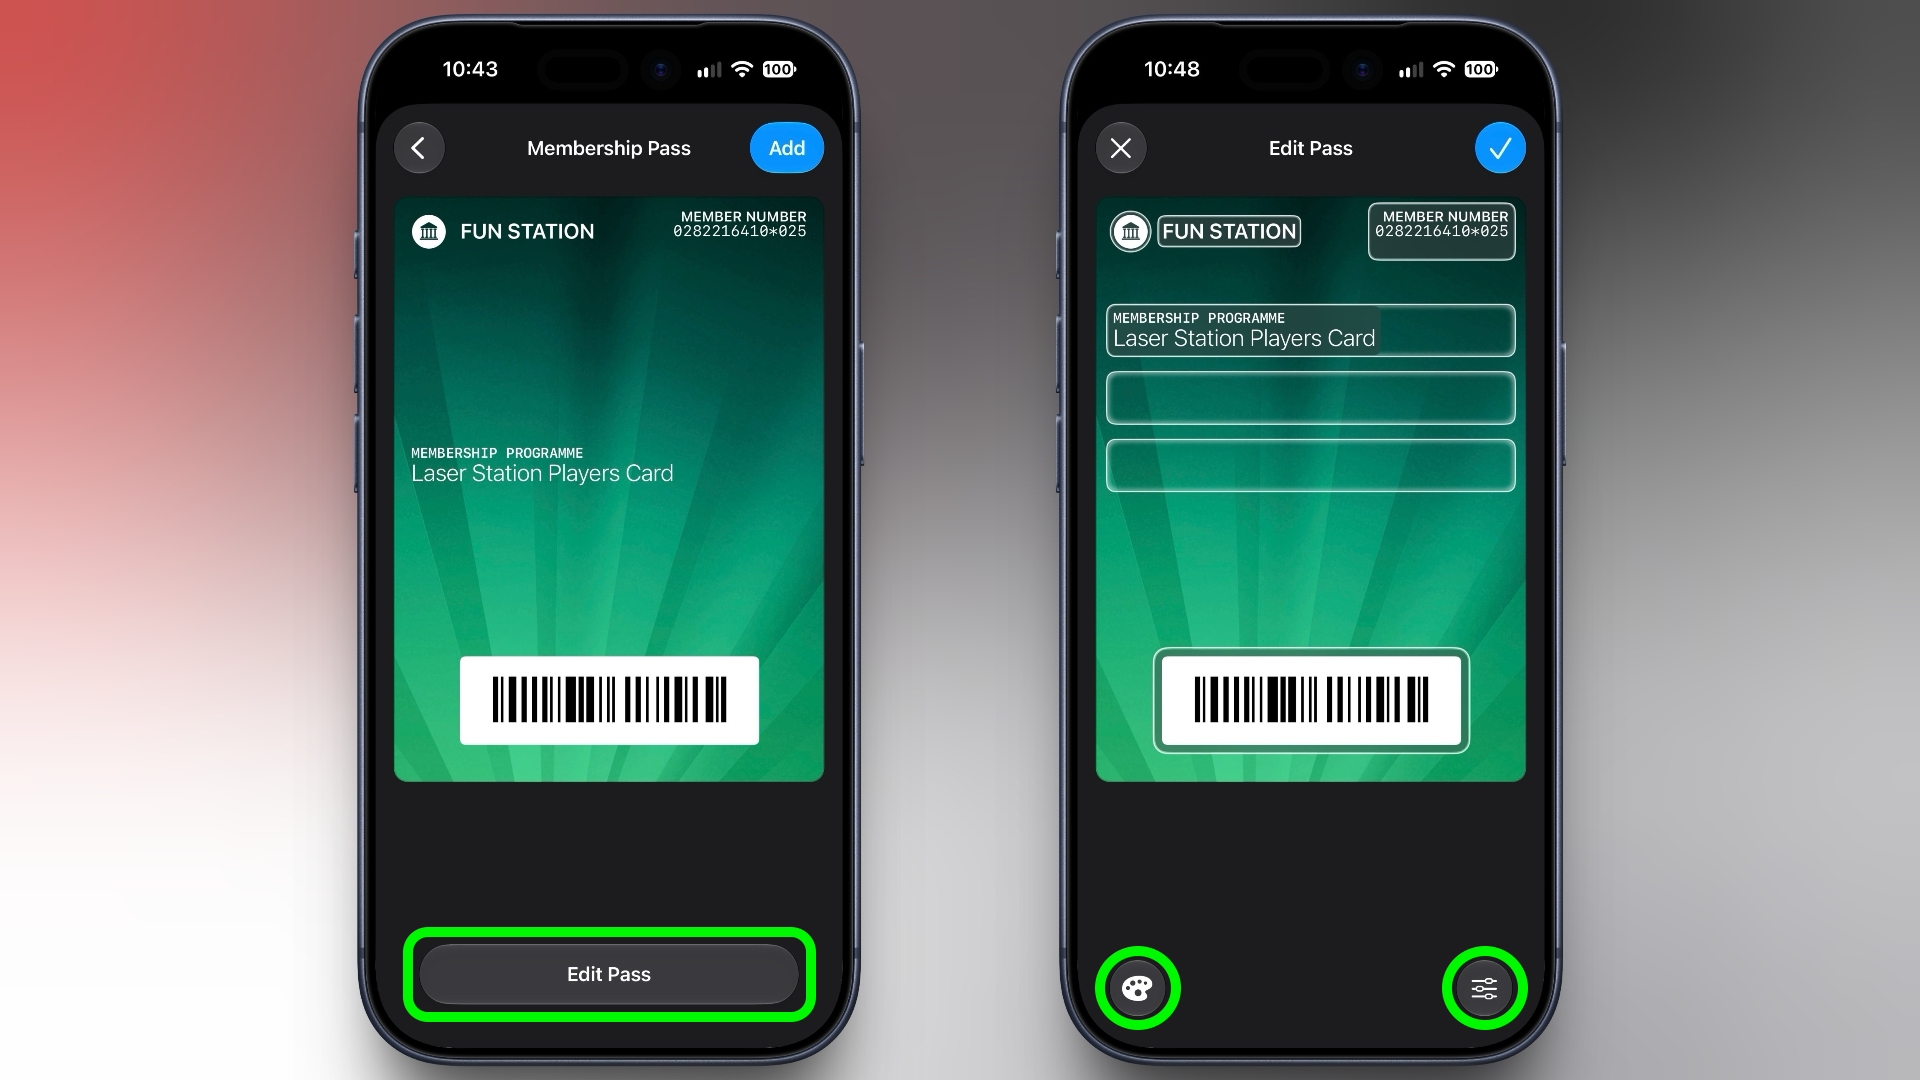
- Tap the blue checkmark at the top of the screen when you are finished customizing your pass.
Once completed, your brand-new custom pass will immediately appear inside your Wallet app alongside your other digital cards and passes. It is instantly ready to present whenever you need to scan a barcode or check pass details.
How to Create a Custom Pass Manually
If you prefer not to use Visual Intelligence or if you want complete control over pass layout from the start, iOS 27 also provides a manual creation workflow. Creating a custom pass manually is just as quick and straightforward.
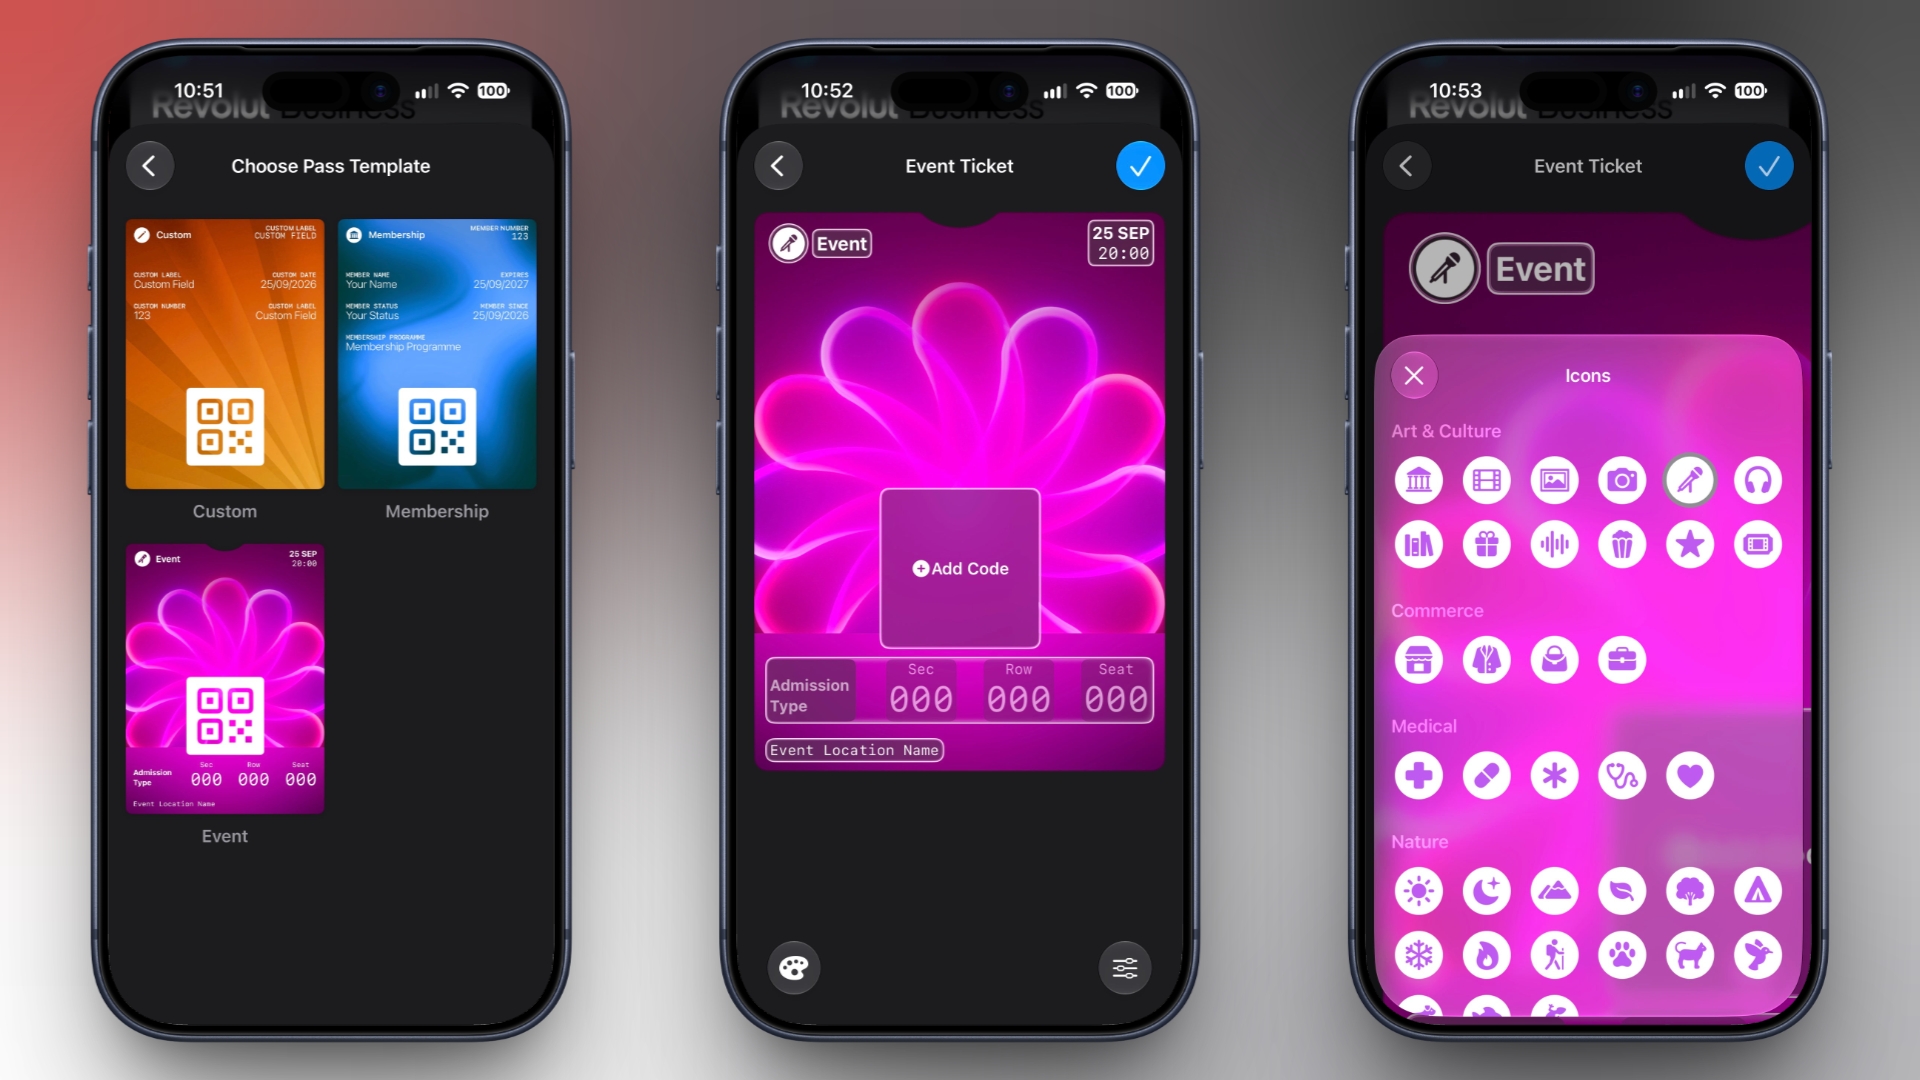
To begin manual creation, open the Wallet app, tap the plus sign, and select Create a Pass. Instead of choosing the automatic scan option, select the manual setup method. You will then be prompted to pick one of three starter templates that best fits your card type:
- Membership: Designed for loyalty programs, gym memberships, club passes, and retail reward cards.
- Event: Ideal for concert tickets, sports games, theater performances, and movie screenings.
- Custom: A flexible blank template suitable for insurance cards, special codes, or generic physical passes.
After picking your desired template, adjust the color, background graphics, and title details. To ensure the pass can be scanned at check-in or checkout, scan the barcode or QR code directly from your physical pass using your camera. Once the code and details are entered, tap the checkmark to save the card directly to your iPhone Wallet.
Customization Options: Colors, Backgrounds, and Data Fields
Apple gives you wide creative control over how your custom passes look and function. Whether you build your pass with Visual Intelligence or configure it manually, you can personalize both visual design and information layout.
Choosing Background Colors and Themes
Visual styling helps you distinguish different cards in your Wallet at a single glance. To help you organize your collection, the Wallet app offers 12 background colors to choose from. You can assign bright colors to priority cards or subtle tones to everyday membership passes.
For specific activity categories, the Wallet app includes seven custom pre-designed backgrounds tailored for popular entertainment types:
- Theater
- Music
- Sports
- Movies
- Exhibits and Shows
- Special Events
- General Entertainment
If you want a truly personal touch, you can skip the built-in presets entirely and select any image stored in your Photos library as the custom pass background. This allows you to use personal photography, venue logos, or event banners as your pass header image.
Adding and Removing Custom Fields
Every physical card holds different information, which is why customizable data fields are an essential part of the creation process. Depending on the card type, fields can be added or removed effortlessly to ensure all necessary details are stored digitally.
Here are the primary field options you can customize when building a pass:
- Label: Customize field titles such as pass title, cardholder name, or tier status.
- Date: Add event start times, expiration dates, or renewal schedules.
- Membership: Store account numbers, membership IDs, or tier levels.
- Contact: Include support phone numbers, email addresses, or website links.
- Coupon Code: Save promotional promo codes, discount strings, or voucher numbers.
- VIN: Record Vehicle Identification Numbers for auto insurance or roadside assistance cards.
- Insurance: Store policy numbers, group IDs, and insurance provider details.
With this wide variety of field configurations, virtually any physical card or paper stub can be converted into a structured digital asset inside your Apple Wallet.
How to Edit a Custom Pass After Saving
What happens if event details change or you want to update the background picture on a pass you already created? Fortunately, custom passes stored in your Wallet app can be edited at any time without having to recreate them from scratch.
Follow these quick steps to update an existing custom pass:
- Open the Wallet app on your iPhone.
- Tap on the custom pass you wish to modify.
- Tap the three dots icon located in the top-right corner of the screen.
- Select Edit Pass from the drop-down menu.
- Modify background colors, background images, or data fields as needed.
- Tap the blue checkmark at the top of the screen to save your updated changes.
Editing options make it effortless to update membership renewal dates, adjust personal notes, or refresh design elements whenever necessary.
Popular Use Cases for Custom Passes in Apple Wallet
The ability to create a custom pass in the Wallet app on iPhone opens up countless practical applications for daily organization. Here are several real-world examples where custom passes prove especially helpful:
1. Community Events and Local Ticket Passes
While major ticket platforms offer direct Apple Wallet integration, smaller local venues, high school sporting events, and community theater groups often distribute PDF tickets or physical paper passes. By taking a photo of the paper ticket, you can turn local event entries into scannable digital passes instantly.
2. Retail Loyalty and Local Gym Memberships
Many local businesses, neighborhood coffee shops, and independent gyms hand out physical barcode cards or paper punch cards. Converting these cards into custom passes keeps your key chain light and ensures you never forget your membership card at home when heading out for a workout or coffee run.
3. Vehicle Identification and Auto Insurance Cards
Vehicle information cards and insurance verification papers are essential items to keep accessible. By adding designated fields like VIN and insurance policy details into a custom pass, you keep important automotive identification details securely stored on your device.
4. Gift Cards and Discount Vouchers
Physical paper store coupons and plastic retail gift cards are easily misplaced in drawers or wallet pockets. Digitizing these items with custom field options for coupon codes and balance notes ensures you spend gift card funds before they expire.
Tips for Getting the Best Results When Scanning Passes
To ensure Visual Intelligence accurately captures your physical pass on the first try, keep these helpful tips in mind when photographing your card:
- Ensure Adequate Lighting: Scan your card in a brightly lit room or under natural sunlight to minimize shadows and glaring reflective spots.
- Place Pass on a High-Contrast Surface: Lay white paper tickets on a dark background table so Visual Intelligence can clearly detect card edges.
- Hold Camera Steady: Avoid camera blur by keeping your iPhone steady while alignment frames center around the barcode or QR code.
- Verify Clean Camera Lenses: A clean camera lens helps Visual Intelligence read small text and fine barcode lines accurately.
Frequently Asked Questions About Apple Wallet Custom Passes
Can I create a custom pass for any physical card?
Yes, as long as you have the physical pass or card details available, you can digitize it using either Visual Intelligence scanning or manual entry. Custom field options accommodate most standard card formats, including barcodes and QR codes.
What templates can I choose from when creating a pass manually?
When setting up a pass manually, you can choose from three main templates: Membership, Event, or Custom. Each template comes pre-configured with fields tailored to specific pass types.
How many background colors are available for custom passes?
The Wallet app provides 12 standard background colors as well as seven custom thematic backgrounds tailored for categories such as theater, music, sports, and movies. You can also select personal photos directly from your Photos library.
Can I update or delete custom fields after saving my pass?
Yes, you can edit your pass at any time. Simply open the pass in Wallet, tap the three-dot menu icon in the top-right corner, select Edit Pass, and add or remove field options as needed.
Conclusion
Learning how to create a custom pass in the Wallet app on iPhone is a game-changer for organizing your daily physical cards, event tickets, and loyalty rewards. With iOS 27 and Visual Intelligence, digitizing physical paper and plastic passes is faster and more flexible than ever. Start turning your physical clutter into clean, functional digital passes today to keep all your important cards accessible right from your iPhone.
Tag: Apple Wallet
This article, "Create a Custom Pass in the Wallet App on iPhone" first appeared on MacRumors.com
Discuss this article in our forums
from MacRumors
-via DynaSage
